Showing posts with label Natural Hairstyle Tutorial. Show all posts

Thursday, July 07, 2016

10 Cute Vacation Hairstyles For Natural Hair

Summer brings out the best in my curls. The volume and my fluffy kinks give me all kinds of LIFE. But...it also brings out the worse in my hair. Think frizz and a mind boggling amount of SHRINKAGE. And when I'm on vacation, I just got no time for my hair's unpredictability. So on those days when my hair just won't act right, I toss it up into one of these uber cute fun in the sun vacation hairstyles:


1/ KURLY KLIPS [Clip in Extensions] (tutorial)

What I love about Kurly Klips is that they are quick, easy, and you can keep all of your hair hidden while still rocking big bad hair.

RELATED: How I Protect My Hair Under Kurly Klips

2/ TOP KNOT (tutorial)

The top knot will always be in season. Especially when it's hot, hazy, and humid. Adding a flirty flower accessory gives this style a fun vacation feel.

3/ DOUBLE DUTCH BRAID + BRAID (tutorial)

Two braids pulled into a low bun. Simple. Easy. Quick. Uber cute! I loved this style whilst I relaxed my hair but it's even better now that my hair is curly! 

4/ TUCK & ROLL (tutorial)

I literally tuck, roll, and pin my curls up into this style. It takes no effort at all, keeps my hair tamed, and looks like I spent more than 5 minutes getting myself together. Win Win!


5/ HEADBAND + CURLS (tutorial)

Just like adding a head band---the second easiest way to jazz up your vacation look is with a flirty fun headband. Head bands work double duty for me. It's a way to smooth my edges and give my messy updos an intentional look.

6/ LOW BUN (tutorial)

I love this low bun because it's voluminous, doesn't snatch my edges, and super comfortable. I don't have to use weave or one of those cute mesh donut thingamajigs either. The best part of this updo is that it doesn't ruin my curls. At night, I take all the pins out, shake my hair out then band it. (here are the dets on how I band my hair) When I release the bands the next morning, all I have to do is fluff and go! This is how I wore my hair the next day!

7/ TURBAN + PUFF (tutorial)

The high puff is my go to style when the heat and humidity makes me feel like I'm going to spontaneously combust. Adding a turban gives the style an extra oomph and va va voom.

8/ SIDE SWEPT WASH & GO (tutorial)

Wash and go's are perfect the summer. Here's a cute way to jazz it up: pull all your curls over to the side then add a few hair pins and maybe a decorative head band to give the style even more pizazz. This style works well for any curl set; especially perm rods!

9/ HEADWRAP (tutorial)

The absolutely easiest, chicest, sassiest, solution to your vacation hair problems. Just throw a colorful patterned headscarf on, add some hoop earrings, then call it done! With so many ways to tie a headscarf and their affordability, how can you say no?

10/ FISHTAIL BRAIDS (tutorial)

Goddess braids are super versatile. They're perfect for pool side lounging and vogue enough for a night out. The key to a thick braid is to gently tuck on each side of the braid to fluff it out.

What's your favorite vacation style? Link it up below!

Besitos!
KLP


Wednesday, June 22, 2016

[Tutorial] Low Bun For Natural Hair

Y'all know that I love a good updo. I'm still living that wash and go life, but by the end of my hectic the day, my curls are usually in this low bun situation.  I love this low bun because it's voluminous, doesn't snatch my edges, and super comfortable. I don't have to use weave or one of those cute mesh donut thingamajigs either.


Here's how to get this low bun:


  1. Moisturize, detangle, and seal your hair. 
  2. Create a middle part. (Any part will do. I like the middle part because I struggle to get my bangs pulled back when I do a side part)
  3. Apply a product to tame our edges. I used Eco Styler Krystal Gel (buy it here). 
  4. Smooth your hair back into a low puff using a hair tie. I used my DIY Ribbon Hair Ties (here's how to make them). The key is not to double the hair tie. 
  5. Roll, tuck and pin your hair around the perimeter of the hair tie to form your bun. 
  6. Finish with a light mist of hair spray (I used Chi Enviro Flex Hold Hair Spray to keep your curls in place and tame frizzy flyaways.  

The best part of this updo is that it doesn't ruin my curls. At night, I take all the pins out, shake my hair out then band it. (here are the dets on how I band my hair) When I release the bands the next morning, all I have to do is fluff and go! This is how I wore my hair the next day!

How was your #washdayexperience? Anyone else sporting an updo this week?

Besitos!
KLP


Tuesday, June 14, 2016

DIY Ribbon Hair Ties For Natural Hair

Have you ever struggled to find the right hair tie for your high puff or low bun? The new hair tie is too tight. The old hair tie has been stretched out too far. Let's not even try to count how many hair ties your hair has destroyed. The struggle is so real. But I have GENIUS solution for you: Make your own hair tie that is the perfect size and stretchiness for your 'do.

RELATED: How To Get The Perfect High Puff


Ribbon Elastic Hair ties are stupid easy to make; literally effortless. If you can tie a knot---then you can make a boat load of hair ties. Personally, these are my favorite hair ties for banding my wash and go. Banding with these hair ties doesn't cause breakage and prevents those weird indents that I get from regular hair ties.

RELATED: Perfecting Your Wash and Go with Banding
 

Benefits of Ribbon Elastic Hair Ties

  • No metal to snag your hair on
  • Ceaseless
  • Incredibly gentle
  • Stupid cheap
  • Comfortable
  • Always the perfect size
  • Customize your color

Here's what you'll need:
5/8" (or larger) Fold Over Elastic
Fabric Scissors
Ruler/ Measuring Tape
Optional: Candle flame/lighter to seal the ends


How To Make Ribbon Elastic Hair Ties

  1. Measure your fold over elastic. For medium hair ties, I used 11" of elastic. Large (think for your high puff) I used 20". And for headbands I used 28". 
  2. Cut your desired length. Regular scissors will due but fabric scissors are best. Fabric scissors are very sharp which will give your cut a clean edge.
  3. Match the ends together with the shiny side up. 
  4. Make a knot at the ends then slide the knot closed leaving about 1/2" at the end. 
Optional: You can use the flame from a candle or a lighter to seal the ends of the ribbon elastic to keep it from fraying. In my experience, this step isn't really necessary. Because I use very sharp fabric scissors, the ends of the ribbon rarely frays, even after heavy use.

Viola. You're done.  No more headaches from your headband being too tight and your puff or bun will still be slicked for the 'gawds.


Have your say! Would you use DIY Ribbons Hair ties?

Besitos!
KLP


Wednesday, April 13, 2016

10 Quick and Easy Updos For Natural Hair

I LIVE and DIE for a quick and easy updo. Especially since I stopped relaxing my hair. I just don't have time for crazy complicated hair styles.


I'm guilty of hitting the snooze button one too many times. I often forget to set my hair the night before. And don't get me started on all of my failed wash and gos. Nonetheless, I refuse to walk out of the house looking a hot mess. So instead of giving you a boring #washdayexperience this week, I decided to share 10 of my favorite super  quick and easy updos: 

1/ SWIRLED CROWN BRAID (tutorial)

The perfect way to elevate a humble dutch braid. The key to this style is gently fluffing the sides of the braid to give it volume and make it look thicker.

2/ KNOTTED UPDO (tutorial)

Not a braid. Not a bun. All protective. Stupid simple. This Knotted Updo is perfect for any length hair. I used a technique called banding to stretch my curls.

RELATED: How to stretch natural (and transitioning) hair without heat! 

3/ TWO STRAND TWIST UPDO (tutorial)

The final chop of my texlaxed ends left my bangs super short which made styles other than a high bun difficult. After a little trial and error, I realized that two strand twisting my bangs first + a few well placed hair pins was all I needed to create a cute "not a boring bun" look. 

4/ FLAT TWIST BUN (tutorial)

I love using curlformers to stretch my hair then pulling the curls up into a protective style. And this Flat twist Bun is the perfect example of that. This style is chic but simple and the longer that you leave it in, the more voluminous it makes your hair look. So if you have hair on the finer side---this style is for you!


RELATED: How to use Curlformers on Natural Hair


5/ FISHTAIL BANANA CLIP (tutorial)

Banana clips are a fun way to put your hair into a quick updo. Then you can pin your ends up to turn the updo into a protective style.

6/ SWIRLED FLAT TWIST BUN (tutorial)

Make one large flat twist then two single twists then BOOM you gotta super cute hairstyle! Again, the length of your hair doesn't matter for this style.

7/ HIGH PUFF (tutorial)

Of course this list wouldn't be complete without my high puff. It's the style that I love to hate. It's the epitome of easy but it makes me soooo lazy with my hair. 

8/ FLUFFY TOP KNOT (tutorial)

As I got deeper in my relaxer stretch turned transition, pulling my hair into a high bun got harder and harder. That is until I worked my hair into this gorgeous fluffy top knot.

9/ HEAD WRAP SCARF BUN (tutorial)

This style has two steps: Bantu knot your bangs then wrap your hair in your favorite printed scarf. Easy peasy!

10/ CURLY UPSWEEP (tutorial)

Necessity is the mother of invention. All I had was a failed twist out, 5 minutes, and a stretched out hair tie; and it was all I needed to create this style. I pulled my hair into a high puff leaving down a large section to give myself a curly bang.

What's your favorite updo? Link it up below!

Besitos!
KLP


Wednesday, March 02, 2016

[Tutorial] Swirled Flat Twist Bun for Natural Hair | The #WashDayExperience


My curlformer curls from last week went into bun. *curse you spring allergies!* I co-washed as usual and put my hair in a high puff until today's #washdayexperience. Because I'd left my poor ends to dry out---I tweaked the regimen that I've been sticking to just a little but kept the products exactly the same.


Here's what I used:

Pre-shampoo- DIY Moisturizing Mist (tutorial here) + Herbal Essences Hello Hydration Conditioner  (review here) + Extra Virgin Coconut Oil (Why I 💕 EVCO!) + My Stimulating Essential Oil on my scalp
Clay Rinse- Here's the dets on my recipe
Deep Condition- Jessicurl Deep Treatment Conditioner (review here)
Leave-Ins- Extra Virgin Coconut Oil (Why EVCO is AMAZING here) + Jessicurl Too Shea Conditioner (why I love this stuff here) + DIY Hair Butter (tutorial here)

RELATED: My Minimalist Natural Hair Regimen

And here's how I did it:


This week's theme is Dry Scalp Remedies, so I started by applying my Stimulating Essential Oil (Here's how to make your own) to my scalp. I've used this blend for years and its my favorite cure-all. The essential oil blend soothes itchiness whilst the oil relives dry scalp. Plus it smells divine!

RELATED: 4 Ways To Fight Dandruff and Flakes

Next, I spritzed the ends of my hair with my DIY Moisturizing Mist (tutorial here). Then I slathered my hair in Herbal Essence Hello Hydration (my full review here) and sealed my ends with a little coconut oil. Because my ends felt drier than usual, I covered my hair with a plastic bag and went to sleep.

RELATED: Why I Deep Condition Overnight

An overnight pre-shampoo session was EXACTLY what my hair needed because in the morning, my hair was crazy plump, soft, and uber moisturized! Next, I hopped in the shower, rinsed the conditioner section by section then applied my Clay Rinse with a narrow tip applicator bottle. I usually start my application process from back to front and I noticed that the curls in the back of my hair are completed defined from root to tip. So, next week, I plan to start the application process from front to back so that my curls in the front can get more clay love.


Next, I deep conditioned with my all time fave conditioner Jessicurl Deep Treatment Conditioner (review here), coated my ends in Extra Virgin Coconut oil (here's the kind that I use $) to seal in the conditioner and plopped under my hooded dryer for about 30 minutes.

RELATED: Why I'm in love with the Coco (Coconut Oil of course!) 


I t-shirt dried for about 10 minutes then installed Curlformers using a little more Extra Virgin Coconut Oil + Jessicurl Too Shea Conditioner (why I love this stuff here) + DIY Hair Butter (how to make your own Hair Butter here) as my leave ins.


I had to run grab the minions from the bus before I could figure out how I wanted to style my hair so I threw my curls up into a banana clip.


When I got home, I decided on this Swirled Flat Twist Bun.


Here's how I did it:
  1. Begin with stretched hair (I stretched my hair using Curlformers.) 
  2. Pull all of your hair to one side. I chose the left side. Then secure with a hair clip.
  3. Take a small section near your left ear and section it off. We'll work with it later.
  4. Now grab a small section of hair near your right ear and begin your flat twist. This twist will end near your temple. 
  5. Begin another flat twist directly behind the first one.
  6. Incorporate the first twist into the second twist.
  7. Then flat twist along your hair line until you reach your left ear.
  8. Then start to curve your flat twist towards your right ear. This will create the swirled effect.
  9. Continue flat twisting until you reach the nape of the right side of your hair. Double strand twist your ends. 
  10. Release your remaining section. Divide it in half. 
  11. Then double strand twist each section.
  12. Cris-cross the last two twists and secure the ends into a bun.  

Optional: Polish the look by smoothing your edges with little edge control. I used Curls Blueberry Bliss Curl Control Paste.


I'll wear this style for 2-3 days before I co-wash and bun my hair for the rest of week.

What are your remedies for a dry scalp? Share all the dets in this week's #WashDayExperience link up below!

Besitos!
KLP


Wednesday, February 10, 2016

[Tutorial] Flat Twist Bun for Natural Hair | The #WashDayExperience


My Fishtail Banana Clip updo from last week lasted for about 48 hours before it started to look raggedy. (Note to self: try not to sweat so dang much!)


My hair ended up in a high bun (like this one) until today's #washdayexperience.


Here's what I used:

Pre-shampoo- DIY Moisturizing Mist (tutorial here) + Herbal Essences Hello Hydration Conditioner  (review here)
Clay Rinse- Here's the dets on my recipe
Deep Condition- Jessicurl Deep Treatment Conditioner (review here)
Leave-Ins- Extra Virgin Coconut Oil (Why EVCO is AMAZING here) + Jessicurl Too Shea Conditioner (why I love this stuff here) + DIY Hair Butter (tutorial here)

And here's how I did it:

I started my spritzing the ends of my hair with my DIY Moisturizing Mist (tutorial here). Then I slathered my hair in Herbal Essence Hello Hydration. If you want a co-washing/pre-shampoo/tangle melting conditioner/EVERYTHING in a bottle---then Hello Hydration is soooo for you! (You can read my full review here)


Related: How I got these curls to POP!

I hopped in the shower, rinsed the conditioner section by section then applied my Clay Rinse with a narrow tip applicator bottle. I'm start to like clay rinsing better than clay masks because its just too cold to be doing extra shower hopping. Next, I deep conditioned with my all time fave conditioner Jessicurl Deep Treatment Conditioner (review here), coated my ends in Extra Virgin Coconut oil (here's the kind that I use $) to seal in the conditioner and plopped under my hooded dryer for about an hour.

RELATED: Why I'm in love with the Coco (Coconut Oil of course!) 


 I t-shirt dried for about 10 minutes then installed my beloved Curlformers using a little more Extra Virgin Coconut Oil + Jessicurl Too Shea Conditioner (why I love this stuff here) + DIY Hair Butter (how to make your own Hair Butter here) as my leave ins.


I'm crazy excited to report that it only takes me 30 minutes to install my curlformers this time! #woot It still takes about an hour to dry and occasionally I have that one curl that just can't get right. Last year, I didn't use my hooded dryer at all---it literally had dust on it. But this year, I find myself using it every wash day. It pains me to say it but I might have to invest in a new one soon. I've had this table top hard bonnet dryer for about 6 years and it gets louder and louder each week. *le sigh* bye bye dollars. It was nice knowin ya...


Anywhos, I finger combed out my curls, made two flat twists then pinned them into a bun. This style is deceptively easy. Here's how I did it:


  1. Begin with stretched hair (I stretched my hair using Curlformers.) 
  2. Make a heavy side part.
  3. Begin your flat twist at your bangs
  4. Work the twist around to the back of your head.
  5. Double strand twist the ends. (You might need a hair tie if your hair unravels.)
  6. Begin your second flat twist on the opposite side.
  7. Double strand twist the ends. (Again, you might need a hair tie if your hair unravels)
  8. Secure the left twist just above your right ear with a hair pin.
  9. Then secure the right twist by tucking it into the left side with a hair pin.
  10. Use as many hair pins as you need to secure and shape the "bun" portion of the look. 
Optional: Polish the look by smoothing your edges with little edge control. I used Curls Blueberry Bliss Curl Control Paste.


How did you style your hair this week? Anyone else struggling to keep their tresses moisturized? Share the dets with the rest of our healthy hair tribe below!


Wednesday, February 03, 2016

[Tutorial] Fishtail Banana Clip Updo on Natural Hair | The #WashDayExperience


My Green Tea Infused Hair Oil Rinse from last week made my hair feel...

Moisturized

Soft

Fluffy

...and really oily.

I'm guessing that I didn't rinse well enough. *le sigh* #thickhairproblems


Then add in 2 hours of soccer practice plus my usual daily workouts---my hair was begging to be washed this week.


Here's what I used:

Pre-shampoo- DIY Moisturizing Mist (tutorial here) + Aubrey GPB Conditioner (review here)
Shampoo- Jessicurl Cleansing Cream (review here)
Deep Condition- Jessicurl Deep Treatment Conditioner (review here)
Leave-Ins- Extra Virgin Coconut Oil (Why EVCO is AMAZING here) + Jessicurl Too Shea Conditioner (why I love this stuff here) + DIY Hair Butter (tutorial here)

And here's how I did it:

I started my spritzing the ends of my hair with my DIY Moisturizing Mist (tutorial here). Then I slathered my hair in Aubrey GPB conditioner. I adore the way that this conditioner helps me detangle, leaves my curls perfectly defined and strong. (You can read my full review here)

I hopped in the shower, shampooed with Jessicurl Cleansing Cream (review here) and rinsed. Next, I deep conditioned with my all time fave conditioner Jessicurl Deep Treatment Conditioner (review here), coated my ends in Extra Virgin Coconut oil (here's the kind that I use $) to seal in the conditioner and plopped under my hooded dryer for about an hour.

RELATED: Why I'm in love with the Coco (Coconut Oil of course!) 


Related: How To Get DOUBLE the curl with Curlformers!

I t-shirt dried for about 10 minutes then installed my beloved Curlformers using a little more Extra Virgin Coconut Oil + Jessicurl Too Shea Conditioner (why I love this stuff here) + DIY Hair Butter (how to make your own Hair Butter here) as my leave ins.


Sometimes I wished that I lived a more lavish lifestyle. One where wearing my hair in big bouncy beautiful curls like these was required. But...I don't. Ha-ha! I'm a regular soccer mom with a ridiculously long messy to-do list where even high buns seem too formal.

So I whipped my hair into this crazy quick and super simple Fishtail Banana Clip updo. Here's how I did it:


  1. Begin with stretched hair (I stretched my hair using Curlformers.) 
  2. Section off your bangs by making two parts at the crown of your head.
  3. Secure with a hair clip.
  4. Secure the rest of your hair with a hair clip.
  5. Braid your bangs using the fishtail technique. (Here's a tutorial on how to Fishtail Braid Natural Hair
  6. When the braid reaches the back of your crown, simply double strand twist to the ends and secure with a hair pin.
  7. Now release the back of your hair and pull it into a pony tail. 
  8. Use your banana clip to secure the hair. 
  9. Divide the hair in the banana clip into two sections. Clip one section away.
  10. Now double strand twist this section
  11. Roll and tuck the twist then use a hair pin to secure it.
  12. Repeat on the last section. 

Optional: Polish the look by smoothing your edges with little edge control. I used Curls Blueberry Bliss Curl Control Paste.

How did you style your hair this week? Anyone else sporting updos? Share the dets with the rest of our healthy hair tribe below!


Wednesday, January 27, 2016

[Tutorial] Braided Headband Tuck For Natural Hair | The #WashDayExperience


My Vintage Tucked updo (you can check it out here) from last week was super cute and kept my ends tucked away but OMG now I remember why I don't use that Scuni Upzing that often; It gives me the worse headache! After two days of my updo, I pulled it down and rocked a twist out.


Then it snowed/rain/sleeted all over the best twist out I've ever gotten. *sad face* *shakes angry fist at the universe* Why won't you let me be great?!?

I had no choice but to wash my hair. Here's what I used:


Pre-shampoo- DIY Moisturizing Mist (tutorial here) + Herbal Essences Hello Hydration Conditioner (review here)
Shampoo- Jessicurl Cleansing Cream (review here)
Deep Condition- Jessicurl Deep Treatment Conditioner (review here)
Oil Rinse- Green Tea Infused Hair Oil Rinse (tutorial here)
Leave-Ins- Jessicurl Too Shea Conditioner (why I love this stuff here) + DIY Hair Butter

And here's how I did it:
I started my spritzing the ends of my hair with my DIY Moisturizing Mist (tutorial here). I initially created this concotoion to moisturize my hair between washes, but now I also use it to detangle pre-wash thanks to an amazing tip from my linkup partna in crime Jen at JGA! Then I slathered my hair root to tip in Herbal Essences Hello Hydration (which has amazing slip btw! You can check out my full review here)

I hopped in the shower, shampooed with Jessicurl Cleansing Cream (review here) and rinsed. Next, I deep conditioned with my all time fave conditioner Jessicurl Deep Treatment Conditioner (review here), coated my ends in Extra Virgin Coconut oil to seal in the conditioner and plopped under my hooded dryer for about an hour.

RELATED: Why I'm in love with the Coco (Coconut Oil of course!) 


After rinsing the conditioner, I used a narrow tip applicator bottle (Like this one of these) to apply my latest potion: A Green Tea Infused Hair Oil Rinse---in honor of this week's #washdayexperience theme "Tea for Two" (Wondering what the heck it is or how to make it? Read the tutorial here) I let the oil sit in my hair for a few minutes then rinsed.

GIIIRRRLLLLL....

I can't even describe it...


Let's just say that I will DEFINITELY do this again, especially with this disrespectful cold weather floating around! My hair felt crazy moisturized strong but soft. I t-shirt dried for about 10 minutes then installed my beloved Curlformers using Jessicurl Too Shea Conditioner (why I love this stuff here) + DIY Hair Butter as my leave ins.


My curls were gorgeous, but I wanted an updo, so I whipped my hair into this Braided Headband Tuck. Here's how I did it:


  1. Begin with stretched hair (I stretched my hair using Curlformers.) Then create a heavy side part.
  2. Secure your bangs with a hair clip.
  3. Using a stretchy headband, place it at the crown of your head. (It might shift about now. That's cool. We'll get it to stay put in just a sec.)
  4. Now braid your bangs and incorporate hair from the front and behind the headband. (Trust me---it will look cute) Continue the braid until the end of your hair
  5. Gently pull on the sides of the braid to make it wider (and fuller)
  6. Then tuck it into the head band
  7. Now tuck the rest of your hair into the head band one section at a time until the headband is hidden.
Optional: Polish the look by smoothing your edges with little edge control. I finally ran out of Chi Twisted Fabric so I used Curls Blueberry Paste instead.

How did you style your hair this week? Did you use a tea rinse? Share the dets with the rest of our healthy hair tribe below!


Wednesday, January 20, 2016

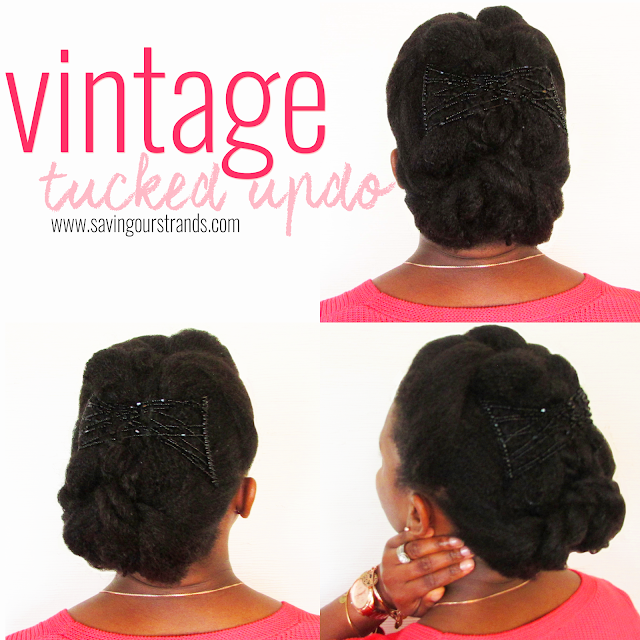
[Hairstyle] Vintage Tucked Updo For Natural Hair | The #WashDayExperience


My fishtail from last week lasted through a two hour hardcore soccer practice and three days of sweaty 5 mile runs before my yucky scalp begged to be co-washed. (In case you're wondering, here's how I co-wash) I tossed my hair into a bun and left it there until today's #washdayexperience.

Here's what I used:


Extreme Deep Condition: Audrey GPB Conditioner + Extra Virgin Coconut Oil
Leave ins- Almond Oil + Jessicurl Too Shea Conditioner + DIY Hair Butter


This week's #washdayexperience theme is "Something new" so I grabbed my new fave Aubrey GPB. Thanks to an amazing tip from Michelle over at FineNaturalHairAndFaith, I applied the GPB to my dry detangled hair and then sealed the conditioner in with Coconut oil. (Here's why I love that coco!) I let the conditioner absorb into my hair overnight and rinsed in the morning.

After rinsing the conditioner, my hair felt AHHMAZINGGG! Like omg omg omg I can't stop touching my curls AHHMAZINNNGGG...

And now Aubrey GPB is definitely a winner! I applied my usual leave ins and put my hair into a few large twists. Then I used hair pins and a Scunci Upzing (Buy your own here) to create this cute little Vintage Tucked Updo.


✓ Ends protected?
✓ Hair stretched?
✓ Crazy quick style?

Woot! What do you think? Yay or nay? And let me know if you want a tutorial on this style!

Besitos!
KLP


Wednesday, January 13, 2016

[Tutorial] Fishtail Udpo for Natural Hair | The #WashDayExperience


My Caruso Steam Roller curls from last week were EVERYTHING. Y'all just don't understand how good it felt to bounce around with big fluffy hair.


But like all good things---those curls had to come to an end. Plus, my scalp was not happy about not washing for 2 weeks. I whipped out my staple products and went to work.


Here's what I used on this #WashDayExperience:

Pre-shampoo- DIY Moisturizing Mist + Herbal Essences Hello Hydration Conditioner
Shampoo- Jessicurl Cleansing Cream
Deep Condition- Jessicurl Deep Treatment Conditioner
Leave-Ins- Almond Oil + Jessicurl Too Shea Conditioner + Camille Rose Whipped Butter

My favorite part of the #WashDayExperience is picking up tips from other bloggers. I knew that my stretched hair was craving moisture so I'm glad that I stumbled upon this little tip from Jen of JGA (you can check it out here). I started by spraying a little of my DIY Moisturizing Mist to detangle my hair in sections then I applied one of my favorite conditioners: Herbal Essences Hello Hydration Conditioner. I let it sit for about an hour. My curls felt AH-MAZING. Shout-out to Jen for the tip!

Next, I rinsed in the shower, shampooed using Jessicurl Cleansing Cream and t-shirt dried for about 5 minutes. This shampoo cleans the gunk (sweat + dirt + product build up) without robbing my curls of moisture. I deep conditioned with Jessicurl Deep Treatment Conditioner overnight. (Here's why I deep condition overnight). Rinsed the conditioner in the morning, then applied my leave-ins as I installed my curlformers.


I love these curls, but I'm still all about that protective styling life so I whipped my hair into this Fishtail updo. Here's how I did it:
  1. Begin with stretched hair (I stretched my hair using Curlformers.Then divide your hair in half. Secure the left side.
  2. Grab a small section of hair on the left side of the part and divide it into two sections.
  3. Use a small piece from the front section, cross it over the top, and add it into the back section.
  4. Take a small piece from the back section over the top and add it into the front section.
  5. Repeat steps 4-5 around the perimeter of your head until the braid reaches your middle part and then continue braiding in a regular style fishtail braid to the end of your hair. (You may need a hair tie here. I didn't)
  6. Fluff your braids by plucking apart the sides for a fuller look and then repeat steps 2-5 on the right side.
  7. Cross and pin the ends of each braid to the opposite side of your head
Optional: Polish the look by smoothing your edges with little edge control. (My favorite is Chi Twisted Fabric)

Thanks to my old faithful products my hair was crazy moisturized and uber smooth. May Jessicurl NEVER go out of business!

How did you style your hair this week? Which staple products did you use? Share your #washdayexperience too!