Showing posts with label The Bun Effect: 30 in 30. Show all posts

Tuesday, September 30, 2014

[Tutorial] Mini Twist High Bun

I have protective-style-phobia. #Ijustmadethatwordup Feel free to judge me. But it's true. I gush about all kinds of braids and twists. Box braids, Marley twists, Senegalese twists, Crochet braids. You name it, I lust for it. I pin hundreds of styles on Pinterest, I even encourage others to get them. Will you see me in the braiding chair? Probably not. I'm just wack like that. I can't commit to long term protective styles to save my life and I'll whine about every expect of the process. Installation takes too long. Removal is too difficult. What if I get bored. Aren't they heavy? Who gonna help me wash these thangs? What about my edges, y'all? <insert eyeroll> I told you I was wack. In all honesty, I just love having complete access to my hair.

I adore the look but not enough to commit. Enter, my mini twist high bun. Part faux twist. Part ultra cool protective style. So simple that a very stylish sassy and sophisticated cave woman could do it. The steps are easy peasy. But first, order in takeout and cue up your DVR, its going to take at least an hour or two. Here's how I did mine:
  1. Starting with detangled, moisturized, and sealed hair, section into 1/4"-1/2" squares.
  2. Twist hair from tip to ends. Repeat a gazillion times. (Exaggeration. Maybe just a million)
  3. Once all of your hair is twisted pull up into a high pony then wrap the ends around into a bun.
  4. Secure flyaways with bobby pins. (You'll need a lot of pins!)
Will mini twists cure my braid fever? Probably not. But it's a start!

Besitos!
KLP

P.S. This picture is definitely not recent. I'm sitting with conditioner in my hair getting ready to do something totally unfabulous to it to share in tomorrow's #washdayexperience

PPS. Today's the last day to enter to win your very own Good Hair Is gift package. Enter ASAP!

Tuesday, June 17, 2014

Summer Braids

There is nothing that screams summer fun like a sexy, quick, and easy braided updo. During the summer, I don't fuss with frizz or even attempt to straighten my hair because it's immediately ruined by the heat, humidity, and daily 100% chance of thunderstorms. Today I'm sharing a few of my favorite braided updos, perfect for BBQs and beach lounging.

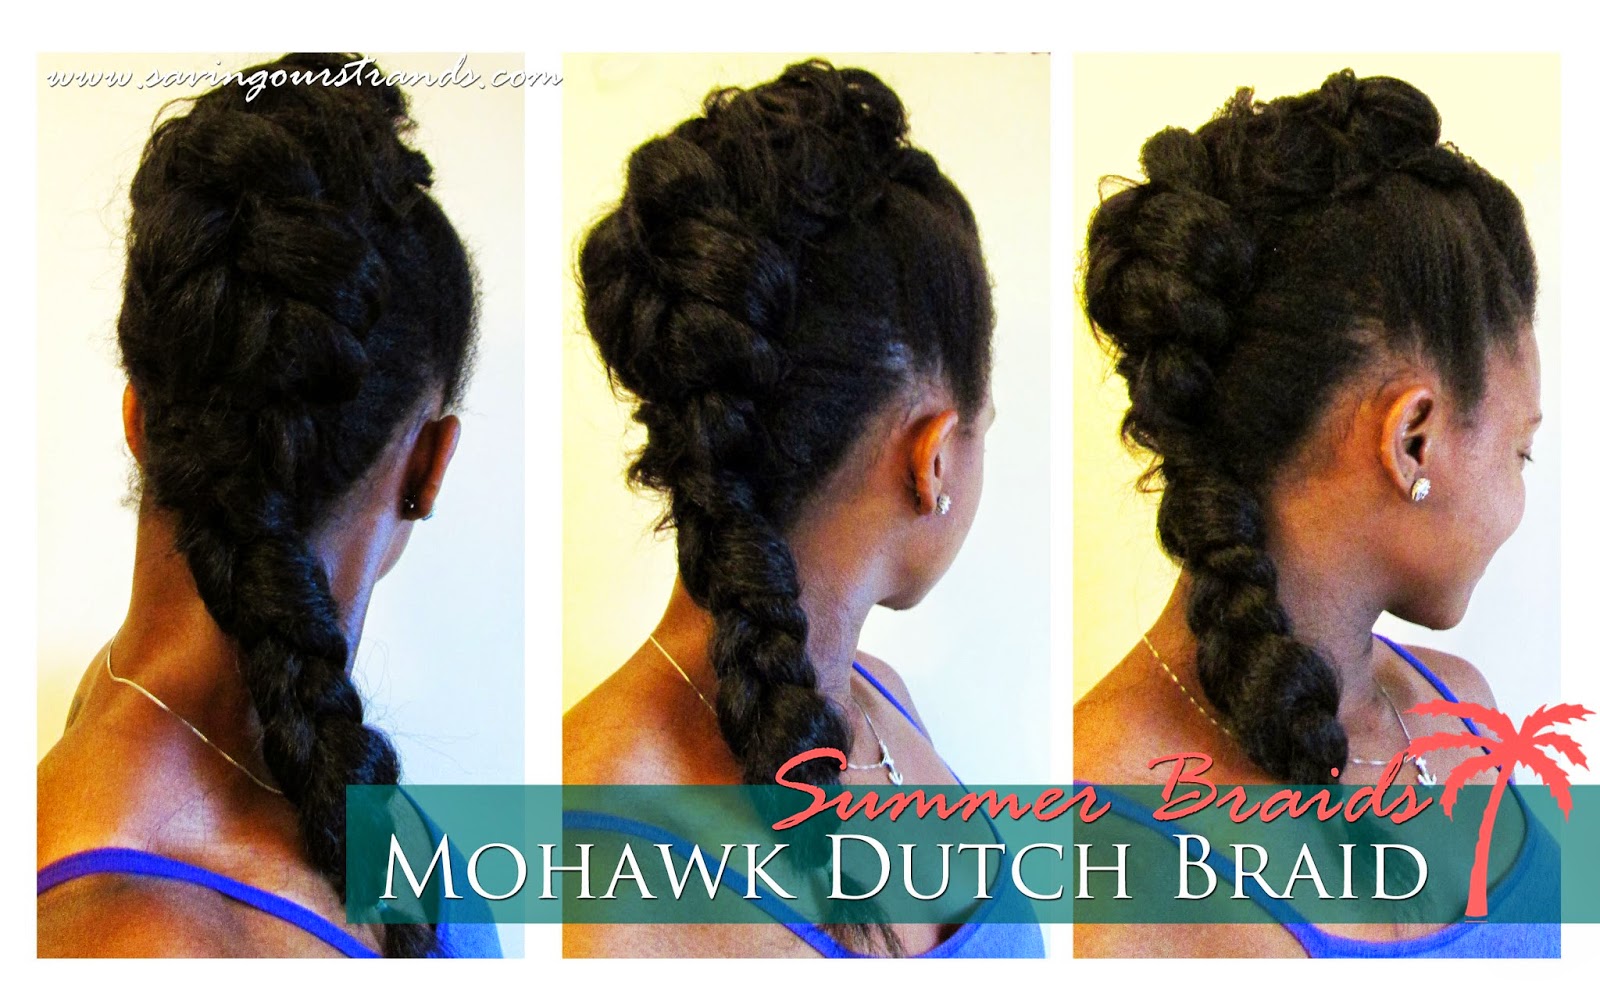
Naptural85 Mohawk Dutch Braid
This braid is the perfect mix of glam functional causal chicness. I love that I can sport it at the pool, wear it to the gym, and out on a date night with the hubby. Plus, it's the only protective style that I've done that's lasted more than 2 days!

How To:
  1. Moisturize and detangle.
  2. Create a pompadour. 
  3. Separate hair into 3 vertical super high ponytails using satin hair ties
  4. Starting with highest ponytail, dutch braid gather a small section of hair at a time. For extra fullness use Kankelon braiding hair or an extension.
  5. Smooth and pin flyaways.


Goddess Braids
I'm in Goddess Braids at least once a week---especially during the summer. They are simple, easy, and quick, plus they're fun and flirty for the summer. If ever you need a style to stretch your roots---this one is it!

How To:
  1. Moisturize and detangle.
  2. Divide your hair in half. Deep Side Parts flatter all faces in this style.
  3. Start your Dutch braid at the front then braid away from your face until you reach the ends
  4. Repeat on the opposite side
  5. Cross the two braids in the back and secure with bobby pins


Milk Maid Twist Braid
I love this style on stretched but not completely straightened hair. I think that the texture makes it casual plus all styles of Milk Maid Braids are totally on trend everywhere right now. Instead of a traditional braid, I do my milk maid style using twists.

How To:
  1. Moisturize and detangle.
  2. Divide hair into two sections. (Optional: Leave a small section out to fame your face.)
  3. Create two loose twists on each side (Four twists total). Start one of the twists at high level and the other near your ear. This will create the illusion of fuller twists. Pull the top twist over to the crown of your head and secure with a bobby pin. Do the same with the bottom twist
  4. Repeat on the opposite side.
  5. Pin until the braids feel secure.
Viola! The only 3 braided updos that you'll need this summer---kinda. Ha-ha! How are you styling your hair this summer?

Besitos!
KLP

    Saturday, March 08, 2014

    Vintage Hair: Rolled bang + Low bun | Pinspired

    Vintage Rolled Bang + Low Bun Protective Style

    Today I'm sharing the style that I've used to avoid heat for the last 5 weeks: Jada Beauty's Vintage Rolled Bang + Low Bun protective style. I love this style because air dried hair gives it fullness and its perfect for an old (or busted) twist/braid out.


    Jada's PIN-tutorial is pretty self explanatory. In less than 5 minutes you can have a super cute protective style. Here are the products that I used when I styled my hair:
    • Dab of Organix Coconut Anti-Breakage Serum through my hair with focus on my ends. 
    • Virgin Coconut Oil massaged on my scalp (it has been 1-2 days since my wash) 
    • Massaged Koils by Nature: Perfectly Peppermint Hair Butter through my hair 
    I styled my hair with a black bow! Y'all know that I love my bows! What have you been PINspired to create?

    xoxo
    Keyda


    Thursday, December 26, 2013

    Hot Holiday Hair (Week 4)

    One&20 and SavingOurStrands Presents: Hot Holiday Hair (Week 4)Ready to bring the SavingOurStrands Braids & Buns Pinterest board to life? Here's our final challenge: ImShineStruck's Halo Braid. Britt over at One&20 is covering how to's, tips, and tricks for the curly natural chicas and yours truly (ME!) is representing for the relaxed&radiant tresses. I know that you have super chic looks too! Share your own hot holiday hair posts in our weekly link up below. We've even got this nifty badge for you to use and don't forget to visit with the other hairlistas in the link up.


    The Halo Braid
    1. Moisturize, seal and detangle hair. (I started on previously tension dried and bantu knotted hair.)
      Split your hair from ear to ear. Finger comb the front section forward covering your face.
    2. Start your flat twist, dutch braid, or two strand twist at your ear. 
    3. Braid along the perimeter of your head until you get back around to your starting point. 
    4. Tuck the ends behind the original braid with a bobby pin.  


    Tips & Tricks
    1. Need Staying Power? Use as many pins has you have to get get the shape that you want. Just be sure to hide them well.
    2. Can't braid? I did a giant flat twist instead of the double strand twist in the tutorial. It was just easier for me.
    3. No shine?  Try applying an oil or butter before styling. I use my kitchenista Tangerine Vanilla Whipped Hair Butter.
    4. Frizzy Edges? Pick up some gel or wax and apply a bit to slick your edges down. Then cover with a scarf for 5-10 minutes.
    I love everything about this style and it's totally going into my weekly bun-less hairstyle rotation. Protective styling never looked so cute! What updo did you try this week? Link it up for us to see below!

    Besitos!
    KLP


    a Rafflecopter giveaway

    Thursday, December 19, 2013

    Hot Holiday Hair (Week 3)

    One&20 and SavingOurStrands Presents: Hot Holiday Hair (Week 3) 

    Ready to bring the SavingOurStrands Braids & Buns Pinterest board to life? Here's week 1's challenge: thebeautydepartment's Summer Winter Lovin'. Britt over at One&20 is covering how to's, tips, and tricks for the curly natural chicas and yours truly (ME!) is representing for the relaxed&radiant tresses. I know that you have super chic looks too! Share your own hot holiday hair posts in our weekly link up below. We've even got this nifty badge for you to use and don't forget to visit with the other hairlistas in the link up. 

    Summer Winter Lovin'

    1. Moisturize, seal and detangle hair. (I started on previously bantu knotted tension/air dried hair.)
    2. Create side part and section hair from ear to ear.(Optional: Leave a small section out to fame your face.)
    3. Loosely braid the back half and secure with a bobby pin. Pick apart and fluff your braid creating an illusion of plumped fullness.
    4. Divide front sections into two, twist each section, pull back, and wind around braid at your nape.
    5. Fashion ends into a loose, messy, chignon and secure with pins.

    Tips & Tricks

    1. Skimpy bun? I opted for a chignon in this style because I wanted it to look fuller without having to use a mesh donut. There's totally a difference between a bun and chignon.
    2. Volume lacking? Try bantu knotting your tresses without holding product for about 2 hours before styling.
    3. Braid trouble? It doesn't matter if you dutch braid, fishtail, or two strand twist. Whatever braid is easiest for you to do---go for it!
    4. No shine?  Try applying an oil or butter before styling. I use my kitchenista Tangerine Vanilla Whipped Hair Butter.
    5. thebeautydepartment.com
    6. Flyaways? Tame flyways by covering with a silk scarf for a few minutes before heading out. I totally wish that I would have done that!
    It was really hard for me to get that center braid right, but once I did, the rest was a piece of cake! What updo did you try this week? Link it up for us to see below!

    Besitos!
    KLP


    a Rafflecopter giveaway

    Friday, December 13, 2013

    Hot Holiday Hair (Week 2)

    One&20 and SavingOurStrands Presents: Hot Holiday Hair (Week 2) 


    Ready to bring the SavingOurStrands Braids & Buns Pinterest board to life? Here's week 2's challenge: Tumbir's popular-hairstyles Double Braid Bun. Britt over at One&20 is covering how to's, tips, and tricks for the curly natural chicas and yours truly (ME!) is representing for the relaxed&radiant tresses. I know that you have super chic looks too! Share your own hot holiday hair posts in our weekly link up below. We've even got this nifty badge for you to use and don't forget to visit with the other hairlistas in the link up. 

    Double Braid Bun

    1. Moisturize, seal and detangle hair. (I started on previously bantu knotted air dried hair.)
    2. Create a side part and section hair from ear to ear.(Optional: Leave a small section out to fame your face.) 
    3. Pull back half into a low bun.
    4. Loosely dutch braid each front section. Pick apart and fluff your braid creating an illusion of plumped fullness.
    5. Pull the ends back and wrap around the bun. Secure with pins.

    Tips & Tricks

    1. Skimpy bun? Use a mesh donut like I do here
    2. No Definition? Don't bother. I love a good messy updo. Roll with elegant yet casual look.
    3. Braid trouble? It doesn't matter if you dutchbraid, fishtail, or two strand twist. Whatever braid/twist is easiest for you to do---go for it!
    4. Lackluster?  Try applying an oil or butter before styling. I use my kitchenista Tangerine Vanilla Whipped Hair Butter.
      popular-hairstyles.tumblr.com
    5. Flyaways? Tame flyways by covering with a silk scarf for a few minutes before heading out. I totally wish that I would have done that first!
    What updo did you try this week? Link it up for us to see below!

    Besitos!
    KLP


    Thursday, December 05, 2013

    Hot Holiday Hair (Week 1)

    One&20 and SavingOurStrands Presents: Hot Holiday Hair (Week 1)


    Ready to bring the SavingOurStrands Braids & Buns Pinterest board to life? Here's week 1's challenge: bellashoot's Messy 4-Braid Updo. Britt over at One&20 is covering how to's, tips, and tricks for the curly natural chicas and yours truly (ME!) is representing for the relaxed&radiant tresses. I know that you have super chic looks too! Share your own hot holiday hair posts in our weekly link up below. We've even got this nifty badge for you to use and don't forget to visit with the other hairlistas in the link up. 

    The Messy 4-Braid Updo

    1. Moisturize, seal and detangle hair.
    2. Split hair ear to ear then from front to back into 4 sections. (Optional: Leave a small section out to fame your face. I bantu knotted my bangs for a soft curl)
    3. Loosely braid each section. Pick apart and fluffy your braid creating an illusion of plumped fullness.
    4. Repeat until complete. Secure the section with a hair tie if necessary.
    5. Take one of the braids in the back and cross it over the back of your head. Secure with a bobby pin. 
    6. Repeat until complete.
    7. Tuck in all of the loose ends. Use a very light holding spray to tame fly aways.

    Tips & Tricks

    1. Need smoothness? Try apply a little tension to your roots and blow drying on cool to smooth them out.
      www.bellashoot.com
    2. Need volume? Try bantu knotting your tresses without holding product for about 2 hours before styling.
    3. Need shine? Try applying an oil or butter before styling. I use my kitchenista Tangerine Vanilla Whipped Hair Butter.
    4. Need holding power? Try a light spray of Chi Enviro Flex Hold Hair Spray to keep the mess in one place
    5. Need fullness? Be sure to pick apart and fluff each braid to give that illusion of plumped intricate fullness.
    It took me 4-5 (hundred) attempts to get this one exactly the way that I wanted, but I'm so glad that I didn't give up! What updo did you try this week? Link it up for us to see below!

    Besitos!
    KLP


    Hot Holiday Hair: Braided Bun With A Bow


    Holiday Hot Hair: Braided Bun With A Bow
    This style was revisited from my previous Only Mins to Win it style!

    Directions:

    1. Bend upside down. Gather hair at middle back of head and begin braid. You want to make sure it is tight.
    2. After braid was done up to top, I gathered hair and placed elastic band over it.
    3. To get my bun effect, I spread out my ponytail towards my face. Then I did a "pin curl" with my ends basically around to make my bun.
    4. Vaaalaaaaa ...spice up your bangs! Place bow at back and you have a gift of lovely hair! hehe (You can place the bow in front as well! - Check both my versions)

    Want more hair-inspiration? Check out the gorge updos in our Hot Holiday Hair Link Up

    xoxo
    Keyda

    Tuesday, December 03, 2013

    Wash Day - 6 weeks post {Keyda}

    Happy Holidays Chicas!!


    Some tidbits: I washed my hair right before Thanksgiving and the following hair style was my "go-to" for the Holiday Weekend! 

    (1) Detangled my hair with my Magic Rake comb
    (2) Prepoo with my OddStrandOut Coffee Oil mix on my scalp and the Repairing Awapuhi Ginger Instant Recovery Mask on the length of my hair. I also placed CHI Deep Brilliance Reconstruct on the ends of my hair.
    (3) Cowash with Moroccan Argan Creme Conditioner. I absolutely loved the smell of this product and my hair felt yummy!
    (4) Tea rinse with CC's Naturals Happy Hair Tea. Yummy! :)
    (5) Smoothing Treatment- I added Aphogee Balancing Moisturizer over the tea in my hair and a cap. Then Faux steamed in the shower.
    (6) Leave-ins: I air dried 80%. I applied Aphogee Keratin & Green Tea Restructurizer on length of hair, Nexxus Hydralight lift on my roots and Organix Coconut Anti-Breakage Serum on my ends. I lightly blow dried before styling my hair!


    Front w/ side bang
    Results: My hair is continuing to feel strong but soft. However, as we are engulfed in winter, I have noticed more shedding :/ ... soo I am beginning to start the process of minimizing my shedding. The last thing I want is a increase of my hair falling out!! Ahhhh no bueno

    Hair Style: I did a pretty nice (If I say sooo myself) Braid updo with bow for the holidays! Tutorial coming soon!


    xoxox
    Keyda
    Let me know what you think!

    Thursday, November 28, 2013

    One&20 and SavingOurStrands Presents: Hot Holiday Hair

     
    Have you seen a bunch of uber cute holiday updos on Pinterest but not sure if you can recreate it on your hair texture? Well my girl Britt over at One&20 and I have a solution for that! Over the next few weeks well be bringing the SavingOurStrands Braids & Buns Pinterest board to life. Britt will cover the styles for the curly natural chicas and I'll represent for the relaxed&radiant tresses. We'll give you real-life step by steps, tips and tricks. Oh---but wait there's more: You can connect too! Share your own hot holiday hair posts in our weekly link up. We've even got this nifty badge for you to use and don't forget to visit with the other hairlistas in the link up. I'm siced! How about you?

    Besitos!
    KLP

    a Rafflecopter giveaway

    Thursday, November 21, 2013

    Busted Braidouts Into Beautiful Updos

    Braidouts hate me. No seriously. I can't get a defined fluffy big braid out to save my life. I try. I fail. I try again. I fail again. However, the best part of a busted braid out is the way that it gives an updo life, honey! Y'all have met my Old Faithful 30 Second Style many many times. I've sported this style on straightened hair, air dried hair, bantu curled hair, and now {busted} braid out hair. I've done it so many times that I can do it without a mirror, one bobby pin, and in 30 seconds with a baby on my hip. Sometimes, I add a braided bang. Occasionally, I do a deep side part. Whilst, other times, I throw in a great hair accessory. No matter how I change this style up, it always begins these steps:

    Old Faithful 30 Second Style-
    1. Moisturize and detangle hair.
    2. Split hair into two sections.
    3. Bring your hair from one section to the front. Begin a french braid, instead of braiding to the back, braid to the front. (If this doesn't make sense at first, watch and re-watch the video.) Continue your braid to the end of your length.
    4. Repeat on the other side.
    5. Take one of the braids and cross it over the back of your head. Secure with a bobby pin. Repeat with the other side.
    6. Tuck in all of the loose ends.
    Whilst, I'm not giving up on braidouts by any means, I am going to stick with what I do best: bantu knots. What style to you turn to when your braidout hates you?

    Besitos!
    KLP

    Friday, November 15, 2013

    A Guide To Making Your Bantu Knots Last


    Although those curls are totally worth it, ain't no body got time to be re-twisting up bantu knots every night to keep their curls defined and fluffy. Here's how I keep my set looking fresh for at least 3 days and what I do when things don't go according to plan:


    1. Make sure that you allow enough drying time- My curls in the middle of my crown always take longer to dry then their counterparts. When you unravel before your curls are dry---just know you're bound to look like a frizzy chia pet by the end of the day.

    2. Your cocktail matters: This is the only time that I'm strict about order of operations-- Moisturizer + Oil + Holding product--is the key to gorgeous curls that last. Now, I'm all about using what your hair likes but just be sure that the products that you use together like each other. Some moisturizers don't like some oils and some holding products loose their minds when compounded with some moisturizers. Date a few cocktails until you find one that you like. My current fave for long lasting curls is Jessicurl Too Shea Extra Moisturizing Conditioner, my Tangerine Vanilla Whipped Hair Butter and Shea Moisture Curl Enhancing Smoothie.

    NaturallyCurly Guide to the Pineapple
    3. Pineapple your heart out: I hang my head upside down and pull all of my curls to the crown of my hair then tie with a satin scarf with the knot in the front. Some days it works like a charm---other days meh...not so well. Whatever you do--don't smooth or stretch your curls. They will be flat in the morning.There are tons of pineappling methods (check out this pintutorial from naturallycurly.com), figure out what works for you and stick to it.

    4. Moisturize and seal in the morning: When I moisturize before pineappling my curls turn into waves. But not moisturizing is a sin---so I just moisturize in the morning once I take down my scarf. It breathes life into my curls--which are usually looking a hot wonky mess by morning.

    5. When in doubt, Bun Effect it: By day 3/4, my curls look more like waves---so I work them into a faux bob or side bun. Old or failed Bantu curls are a perfect base for an ultra-cute updo!

    What are your tips to making Bantu knot curls last?

    Besitos!
    KLP

    Wednesday, November 06, 2013

    How To Get A Big Bun Without Mesh Donuts or Weave

    Healthy Hair Question: 
    Q: First, do you use mesh donuts for your buns? If not, how in the heck do you get those bigggg buns?


    A: I love me a BIG ol doughy bun! I have used mesh donuts for some of my buns in the past, but I've never used a weave. Here are my secrets to big doughy buns without a mesh donut, heat, or a weave on about shoulder length or longer hair:

    1. Air Dried Stretched Hair- My fluffiest buns are started on hair that has been detangled, air dried, and stretched. Moisturize your hair however you want. Seal it with whatever you like. But be sure to detangle and stretch your curls without heat. Because I have 18 weeks of curly post relaxer roots, I faux band my hair and bantu knot it (without a holding product in my cocktail). My favorite moisturizing triple threat has been my Aloe Tea Spray, Jessicurl Too Shea Extra Moisturizing Conditioner and Tangerine Vanilla Whipped Hair Butter.
    2. Banana Clips and Hair Pins- I don't know about you, but finding a hair tie in my house is like panning for gold. Most of the time, I'm totally unlucky. However, I can always find a Scuni Banana clip. They are super cheap, less than $3USD and extremely durable. Plus, I feel like there is less stress on my edges and I have a smoother look. How To: Gather your hair into a pony, high or low, its your pleasure, then secure with your banana clip. Separate strands to fill out clip, then guide hair into a bun around the clip. Your hair should completely cover the flip. Keep it loose and big.
      Secure your fluffy bun with hair pins. Two of the longer pins are usually enough for me.
    3. Aloe Vera Gel- I know that not everyone is about that fuzzy roots and frizzy curl life. So if you slap a little Aloe Vera gel on your edges and then use a silk scarf to tie your hair down, after 10-15 minutes you'll have tamed hair.
    Thanks for your question chica!

    Besitos!
    KLP

    Saturday, October 12, 2013

    Get More Bang for Your Banana...Clip

    Using Banana Clips To Protective Style

    I probably about a dozen banana clips in assorted colors. They're quite durable; I actually still use one that I bought in high school on the regular. Ha-ha! When you're short on time, they are a quick way to style your hair, regardless of how your edges, roots, or ends look that day. It doesn't matter if your hair has been heat styled or air dried. Y te preocupes---the messier and effortless the better. Here are 3 of my favorite ways to work a banana clip:
    Banana Clip French Twist

    Banana Clip French Twist-

    This is my to style for freshly washed hair. It allows my roots to be stretched while my ends are kept up, protected, and moisturized.

    Quick How To:

    1. Moisturize and detangle hair. (This style was created on 90% air dried hair.)
    2. Create a centre part. Bantu knot two small sections of hair in the front.
    3. Gather and smooth the rest of your hair back. Secure where comfortable with a banana clip. 
    4. Take the ends and roll into a french twist, securing with a long hair pin at the top and bottom of the roll. 
    5. Remove bantu knots after they've set and separate to frame your face.

    Bantu Knot Side Tuck-


    So your last Bantu knot out was a terrible fail? No sweat, whip out your banana clip for a big, messy side tuck.
    Quick How To:  
    1. Moisturize and detangle hair. (This style was created on a busted Bantu knot set.)
    2. Create a side part then gather all of your hair to one side. Leave a few curls in the front.
    3. Secure with your banana clip. Finger fluff and separate curls for a fuller look. 
    4. Tuck all of the ends up with hair pins. 
    5. Pull your the loose curls in the front back, tuck, and secure with hair pins.

    Giant Top Knot with Side Swoop-

    Giant Top Knot with Side Swoop
    This style is perfect if you're looking for that coveted doughy top knot but don't want to use a sock bun. I keep it super messy and super simple.

    Quick How To:

    1. Moisturize and detangle hair. (This style was created on straightened hair.)
    2. Create a side part. Bantu knot a section of hair in the front.
    3. Smooth rest of your hair up to the crown of your hair and turn your banana clip horizontal across your head and secure hair. 
    4. Separate strands to fill out clip, then guide hair into a bun around the clip. Secure with hair pins.
    5. Remove bantu knots after they've set and separate to create your curly side swoop.
    Do you use banana clips to style your hair?

    Besitos!
    KLP

    Tuesday, September 17, 2013

    Sleek and Straight Styles

    My sleek and straight hair only comes to visit every blue moon. So I took full advantage of it by and styling testing out a few styles that my fluffy air dried hair can't quite pull off. All of my styles required little manipulation,  low maintenance and high on sass. Here's my sleek and straight style week in review:

    Bantu Knots on Flat-ironed Hair

    Flexi-rods

    Another variation of my fave 30 second bun-less style

    Un mil besitos!
    KLP


    There's only a week left to win my favorite leave in, plus a few of her friends! Check out the Jessicurl Giveaway! You can enter daily!
    a Rafflecopter giveaway