Showing posts with label Healthy texlaxed hair. Show all posts

Tuesday, April 29, 2014

Herbal Tea Rinses To Combat Shedding


I am a tea rinse junky. I've tired over a dozen tea blends, but green, black, and chamomile are definitely my favorites. When I'm consistent in my tea rinse use, I definitely see less less hair clogging your shower. Plus I've noticed that my scalp is clear and free of dryness. Here's how I use herbal tea rinses to combat shedding:


Chamomile Peppermint Aloe Tea

Got Itchy Flaky Scalp and Shedding

Why It Works:
Chamomile soothes your scalp and conditions your hair. Peppermint's cooling sensation increases blood circulation in the scalp. Aloe Vera Gel is known to stimulates the production of new hair and may even lessen the effects of Alopecia. If you suffer from a itchy and inflamed scalp, this is the combo that you want to reach for. (Tip: I heart Aloe Vera Gel in my tea rinses because it gives the mix a thicker consistency so I don't have to worry about it running all over the place!) 

Nourishing Green Rosemary Tea
Got Dry Scalp and Shedding

Why It Works:
Rosemary acts as an antioxidant and anti-inflammatory to soothe itchiness. Green tea is an astringent packed with caffeine known to help increase oxygen to your hair follicles. Glycerin is a natural moisturizing humectant. 

Black Eucalyptus Coconut
Got Breakage and Shedding 

Why It Works:
Black tea has about 55 mg of caffeine per serving versus green tea's 35mg of caffeine. Traditional drip coffee has 100 mg of caffeine. Caffeine is known in the hair world for stimulating the scalp, increasing blood flow, and thus allowing your scalp to get more oxygen and more "food." Eucalyptus is antimicrobial, revitalizing, and clarifying. Coconut oil has been shown in studies to be the only oil that prevents protein loss while helping hair retain moisture. It reduces hair porosity making it spectacular for chemically relaxed hair which is typically higher porosity.

Do you tea rinse? 

Besitos!
KLP 

Tuesday, April 22, 2014

[Review] Jessicurl Deep Treatment


Price: $16.95 (USD)

Purchased at: www.jessicurl.com

Ingredients:
Water (Aqua)*,  Behentrimonium Methosulfate (and) Cetearyl Alcohol, Butyrospermum Parkii (Shea Butter),  Persea Gratissima (Avocado) Oil, Theobroma Cacao (Cocoa) Seed Butter, Aloe Barbadensis (Aloe Vera) Leaf Juice Powder,  Soy Lecithin, Diazolidinyl Urea (and) Iodopropynyl Butylcarbamate

Promises:
Intense pampering for dry hair

How I Use It:
Deep conditioner + heat
Leave in conditioner

My Thoughts:
Jessicurl Deep Treatment is deliciously thick, creamy, and rich. Wait---am I talking about ice cream or a conditioner?! I digress. It's actually one of the thickest conditioners that I own. It moisturizes like no body's business, has a scent that has grown on me, and makes my multi-textured strands behave. It's slip is simply what tangle prone chicas like me dream of. I can instantly feel and see that my hair is absorbing the product. It doesn't any build up as it softens. And whilst, I adore conditioning over night with it---you most certainly don't have to in order for your hair to love it. I've had to literally fight my urge to buy this conditioner by the gallon. The only down side is the packaging. Smh. Why o why is it in a bottle? If y'all could only see my hubby's face when I ask him to use his super sharp shears to cut it open for me so that I can get all of the product out. 
Dear Jessi
I'd love you forever and ever to the moon and back if you packed this luscious conditioner in a jar.
Your bestie KLP's hair
Can you tell that this one is a keeper? Staple status confirmed!

If you're on the search for a beautifully insane moisturizing conditioner, I doubt that Jessicurl Deep Treatment will disappoint. I've been asked frequently if it works for relaxed hair and I passionately say; ABSOfreakingLUTELY. 

(I may have had just a tad bit too much coffee whilst penning this post---don't be alarmed. Ha-ha!)

Besitos!
KLP

Tuesday, April 15, 2014

8 Things That I Learned to Love About My Hair....And It's Also My Birthday!


If you didn't finish your taxes yet...stop reading this and go DO IT NOW. Ha-ha! If you've you already have---Throw some confetti with me chicas! It's also my birthday! I'm immensely grateful and totally thankful for each one of you guys for letting me share a little part of your world! SavingOurStrands totally has the best e-cheer squad in the whole wide world! I love that I have a place to share what I've experienced and learned about life---y si que claro my hair with you! To celebrate my birthday---here are 8 things that I've learned to love about my hair in the last year:


  1. I love having long(ish) hair: I dream about getting one of those sexy lobs (long-bobs) all the time. Especially when I'm fighting one SSK after another, but when I'm done---I'm so happy that my patience and commitment to my hair is paying off with length!  
  2. I love my hair color: It's not brown---but not quite red either. The summer streaks it with highlights. I've even thought about using henna to enhance my natural color. Maybe this is the year that I actually do it!
  3. I love my air dried hair: I'm starting to realize that I actually like big hair! I've fought it for so many years but bantu knots are seriously my thing now. I've done a set at least once a week for almost a year now.
  4. I love my bangs: My bangs are my security blanket. For two really silly reasons: I have a big forehead and I feel like my head is quite large for my body. Ha-ha! I feel so naked with my hair completely slicked back. Thank God for face framing styles!
  5. I love tea rinses: Because I shed madly, tea rinses have literally saved my strands---from falling on the floor. I don't think that there is a coincidence that my shedding has dramatically decreased since I started tea rinsing on a regular basis. I been experimenting with a few new tea rinses ingredients that I'll share soon!
  6. I love that my bestie loves her hair too: I truly adore my friendship with Keyda. She's charming, witty, and always tells me that you can never have too many deep conditioners!
  7. I love that I don't have to straighten my hair to love it: Last year at the beginning of my heat detox, I really struggled with styling my hair. Ugh...I had sooo many blah days. I was so in love with my straight hair that I felt icky with big hair
  8. I love my curly roots: So much so that I'm actually considering an never ending this stretch. Did she just say what I think she said?!? Maybe...maybe not. The jury is still deliberating!
Besitos!
KLP

Tuesday, April 08, 2014

How To Use Nexxus Emergencee on Relaxed Hair

It's no secret that I'm a fan of protein. I believe that using strengthening products that your hair loves helps minimize breakage, refortifies your tresses and maximizes length retention. Its been over 8 months since my last relaxer and I'm trying to defend my ends from breakage at all costs. Most hair obsessed chicas rave about Aphogee 2-Step---it wasn't my cup of tea. If you love the strengthening properties of Aphogee 2-Step, but like me, loathe the smell and consistency, then you'll love Nexxus Emergencee. The scent is mild and the formula is thick. Absolutely, no dripping! It dries quickly and makes my strands felt more swollen---almost thicker to touch. I use it whenever I notice that my ends feel a little ratty or when I see bits of breaking strands on my bathroom floor. Here how I use Nexxus Emergencee on my hair:

  1. Cleanse: Although my hair hates shampoo, I always apply Emergencee to freshly shampooed hair. Why? Because you want the protein to bond and be absorbed into your hair and it can't if your strands are covered in junk. My favorite shampoo is Matrix Biolage Hydrating Shampoo.
  2. Apply: Add an ample amount of Emergencee to completely cover the hair. If you're grossed out by the gel like consistency or trying to savor your manicure pick up a Sprush to make the process easier. Work through.
  3. Let Dry: Air dry or pop under your hooded dryer for 10-15 minutes just until the treatment hardens. Whatever you do, do not manipulate your hair for any reason once it starts to harden. It's tragic. I've been using my trusty Gold N Hot Hard Bonnet since 2009 to get the job done.
  4. Rinse- Thoroughly with warm water. Simply stand under the stray of your shower for 3-5 minutes while the water loosens and rinses the treatment. Again---do not manipulate your hair in any way until the treatment is rinsed.
  5. Deep Condition- Emergencee is a major protein treatment. Always follow up with a heated deep condition. A little Matrix Biolage Hydratherapie Conditioning Balm does the trick for my hair.
Have you used Nexxus Emergencee before? How do you use it?

Besitos!
KLP

Monday, April 07, 2014

Healthy Hairology Medley

Head wrap love
What is Healthy Hairology Medley? It's simply the place where I share my favorite healthy hair tips, tricks, and techniques from bloggers, vloggers, and forums for you each week with the occasional mention of simply cool stuff. A little warning: I'm a little obsessed with all things hair related. But wait---but you already knew that huh? Ha-ha! Here is the best of the best from last week: 
Breaking One of the Detangling Commandments hairscapades: I have a confession. I don't detangle tip to root. *hangs head* But I have a good reason: most of my tangles are mid-strand generally around the line of demarcation. First I grab a section, pull the tangles apart, remove the shed hair then detangle from tip to root. No comb. No brush. Boy was a surprised to hear that Shelli does the same exact thing!
How to maintain your bangs for a week harlemhhj: I've always loved face framing hair styles--but for two really silly reasons: I have a big forehead and I feel like my head is quite large for my body. Ha-ha! I feel so naked with my hair completely slicked back. So, I could totally relate with Harlem shared why her bangs are a security blanket and how so preserves their oomph from wash day to wash day. 
My Crochet Braids {Using Braiding Hair adesiredbeauty: Big hair don't care! Crochet braids are another long term style that I've been crushing on. But y'all know that I'm have commitment-phobia so for now, I'm living vicariously through Melanie. *Flips imaginary waist length crochet braids* #dontjudgeme!

Double Braided Low Bun freshlengths: It's no secret that I love a good ol chic protective style. Lesley delievers with this very classy double braided low bun.

Hair Food anthinghairrelated: Your hair is what you eat...wait...that's not how that saying goes. Ha-ha! But it's totally true The food that fuels your body also contributes to healthy hair. Here are Shelia's favorite hair friendly eats. 
www.kisforkinky.com
What Frida Kahlo Taught Me kisforkinky: Everything about Frida Kahlo screams "I''m a boss AND I woke up like this". Her hair. Her style. Her attitude. She was okay being her and she made you feel like it was okay to be you. Check out what Paris' learned about her hair, life, and honesty from Frida.
Straightening Systems for Black Hair longing4length: The best part about our hair is it's versatility. Spring is here and there's no better way to celebrate than by switching things up a bit. If you're ready to give your hair a sleek straightening but don't know where to begin, read Ebony's outline of the best straightening systems on the market right now.

Besitos!
KLP

Wednesday, March 12, 2014

Wash Day


I haven't used shampoo in about a month and my hair felt kinda meh all week, so I decided to deep cleanse and give my hair some protein power this wash day. 
  1. Detangled- with my fingers and extra virgin coconut oil. 
  2. Pre-Poo- with JBCO on my scalp.
  3. Moisturizing Shampoo- with diluted Matrix Biolage Hydratherapie Hydrating Shampoo applied with an applicator bottle.
  4. Protein Treatment- with Nexxus Emergencee; the world's easiest to apply protein treatment. I let it air dry for an hour or so while I did chores.
  5. Extreme deep condition- Next, I stood under the spray of my shower for about 5 minutes to rinse the Emergencee completely. I deep conditioned with KeraCare Humecto on the length of my hair. Then I massaged my stands with extra virgin coconut oil, covered with a plastic cap and sat under my hooded dryer for an hour and left it in overnight.
  6. Cranberry Pomegranate Green Aloe Hair Rinse- After rinsing the conditioner, I applied 1 part steeped cranberry Pomegranate green tea + 1 part aloe vera gel + 1 tbsp Glyerin, using a narrow tip applicator to my strands--focusing on the roots. I let it sit for a few minutes then rinsed.
  7. Smoothing Treatment- with a large dollop of Matrix Biolage Detangling Solution.
  8. Air Dried- to 80-85% wrapped in a cotton t-shirt.
  9. Leave ins- I used Jessicurl Too Shea Extra Moisturizing Conditioner, my kitchenista Tangerine Vanilla Whipped Hair Butter, and the "faux" banded my hair to stretch roots while it dried.

Results: 
Strong but soft moisturized hair. It was fun revisiting my holy grail conditioner of yester-year this wash day. I used to be madly in love with Humecto, but ditched it about 2 years ago in favor of Matrix Biolage Ultra-Hydrating Balm. Now, I remember why: the scent irritates my nose. I was kinda tempted to wash it out around 2am during my overnight deep conditioning. <shrugs> I guess that some products aren't meant for a lifetime. Adding glycerin to my tea rinse was amazeballs. Detangling was easier than I expected, I loved how manageable my schizo textured hair was and my shed hair was at an all winter low! I styled with a simple french roll. The curls are from bantu knots, si que claro!


Meet Today's co-host: Courtnea from Finally Growing


The Wash Day Experience Linkup RULES

  1. ​Follow your host SavingOurStrands via Bloglovin', Twitter, Instagram, or Pinterest.
  2. Healthy Hair is the theme. Entries completely unrelated to the theme or linked to your homepage will be deleted.
  3. Share it! Your blog post must link back to this site so others see. We even made this nifty button below which links back to The Wash Day Experience page! Just copy and drop the code into your blog post.
  4. Encourage the wash day experience contributor that linked up directly before you with an inspiring  comment. We are each here to support each other and build a community of determined women and hair-friends. Don’t worry, the chica ​who links up after you will do the same; comment love for everyone! 


Besitos!
KLP


Tuesday, March 11, 2014

Bantu Knot Out Hair Styles

Bantu knots are my all time favorite heat-less style. (Because that was a secret huh?) I do them at least once a week---usually more---to give whatever style I'm in the mood for some life. At 35 weeks post relaxer styling can definitely be challenging especially without using heat. Here are a few of my favorite air dried hair friendly bantu knot hair styles:


Bantu Knot High Bun

  1. Using a stretched out hair elastic, pull curls up into a high ponytail.
  2. Secure curls with bobby pins to form bun.
  3. Leave a few curls down to frame your face. 
  4. (Optional) Use your favorite gel, jam, or jelly hair product to smooth your edges.
 

The Messy 4-Braid Updo

  1. Split hair ear to ear then from front to back into 4 sections. (Optional: Leave a small section out to fame your face. I bantu knotted my bangs for a soft curl)
  2. Loosely braid each section. Pick apart and fluffy your braid creating an illusion of plumped fullness.
  3. Repeat until complete. Secure the section with a hair tie if necessary.
  4. Take one of the braids in the back and cross it over the back of your head. Secure with a bobby pin. 
  5. Repeat until complete.
  6. Tuck in all of the loose ends.
 

Bantu Knot Side Tuck

  1. Create a side part then gather all of your hair to one side. Leave a few curls in the front.
  2. Secure with your banana clip. Finger fluff and separate curls for a fuller look. 
  3. Tuck all of the ends up with hair pins. 
  4. Pull your the loose curls in the front back, tuck, and secure with hair pins. 
Just in case you missed it:
Here's how to get your best bantu knots
Here's how to maintain your bantu knots

Besitos!
KLP

Wednesday, March 05, 2014

Wash Day


Mini washing is simply a glorified co-wash. I usually rinse my hair with oil or just water, skip the shampooing, and go straight into my deep conditioning routine. No jumping in and out of the shower 20 million times to get my hair adequately clean and re-hydrated. Although I haven't shared a wash day in forever (a month to be exact) trust me, I am still washing my hair! Ha-ha! Here's what I used to wash my hair this week:
  1. Detangled- with my fingers and a ton of extra virgin coconut oil.
  2. Extreme deep condition- Next, I hopped into the shower for 5 minutes to rinse the oil completely. Then I applied Organix Hydrating Macadamia Oil Intensive Mask. Next, I massaged extra virgin coconut oil throughout, covered with a plastic cap and sat under my heat cap for 2 hours and left it in overnight.
  3. Camomile Aloe Tea Rinse- After rinsing the conditioner, I applied 1 part steeped camomile tea and 1 part aloe vera gel, using a narrow tip applicator to my strands--focusing on the roots. I let it sit for a few minutes then rinsed.
  4. Smoothing Treatment- I rinsed the conditioner then let a large dollop of Matrix Biolage Detangling Solution marinate on my hair for about 5 minutes. 
  5. Air Dried- to 80-85% wrapped in a cotton t-shirt.
  6. Leave ins- Applying the LOC(B) method, to seal in the moisture (L) into my strands, I used extra virgin coconut oil (O), then Jessicurl Too Shea Extra Moisturizing Conditioner (C), and my kitchenista Tangerine Vanilla Whipped Hair Butter (B)as my leave ins I "faux" banded my hair to stretch roots. 
Results:
Some super smooth and soft hair! Having a recent trim worked wonders for decreasing knots plus my detangling was a breeze. I don't know how many more easy wash days I'll get at 34 weeks post, but I'll take it! Since I'm in and out of the gym all week and I'm being super lazy, I went with a simple fluffy bun.


Meet Today's co-host: Miss Dre from SoSheWrites


The Wash Day Experience Linkup RULES

  1. ​Follow your host SavingOurStrands via Bloglovin', Twitter, Instagram, or Pinterest.
  2. Healthy Hair is the theme. Entries completely unrelated to the theme or linked to your homepage will be deleted.
  3. Share it! Your blog post must link back to this site so others see. We even made this nifty button below which links back to The Wash Day Experience page! Just copy and drop the code into your blog post.
  4. Encourage the wash day experience contributor that linked up directly before you with an inspiring  comment. We are each here to support each other and build a community of determined women and hair-friends. Don’t worry, the chica ​who links up after you will do the same; comment love for everyone! 


Besitos!
KLP


Tuesday, March 04, 2014

The Wash Day Experience


The Wash Day Experience is a place where community building and collaboration thrive. The heart and soul of every healthy hair journey is washing your hair. Depending on your prerogative, wash days can be a unwelcomed chore or the best day of the week. Either way, let's find time to celebrate your hair! It doesn't matter whether you're natural, relaxed, texlaxed or somewhere in between; We're all in this together. Every chica deserves encouragement when the journey gets lonely, overwhelming, and just plain torturous!

To join, all you have to do is wash your hair and share your experience. I will host a weekly link-up on Wednesdays where you can share how you treated your hair and report what worked or what didn't work through a blog post, Pinterest, Instagram or Twitter using the hashtag #washdayexperience. Si que claro, you're welcome to wash your hair on whenever day you want. Just don't forget to share here on SavingOurStrands! I'll be sharing my personal wash day and featuring three of my favorite #washdayexperience photos from last week’s participants with a link back to your site. Make it amazeballs---I totally want to pick you! 

The Wash Day Experience Linkup RULES

  1. ​Follow your host SavingOurStrands via Bloglovin', Twitter, Instagram, or Pinterest.
  2. Healthy Hair is the theme. Entries completely unrelated to the theme or linked to your homepage will be deleted.
  3. Share it! Your blog post must link back to this site so others see. We even made this nifty button below which links back to The Wash Day Experience page! Just copy and drop the code into your blog post.
  4. Encourage the wash day experience contributor that linked up directly before you with an inspiring  comment. We are each here to support each other and build a community of determined women and hair-friends. Don’t worry, the chica ​who links up after you will do the same; comment love for everyone! 


Besitos!
KLP

Thursday, February 27, 2014

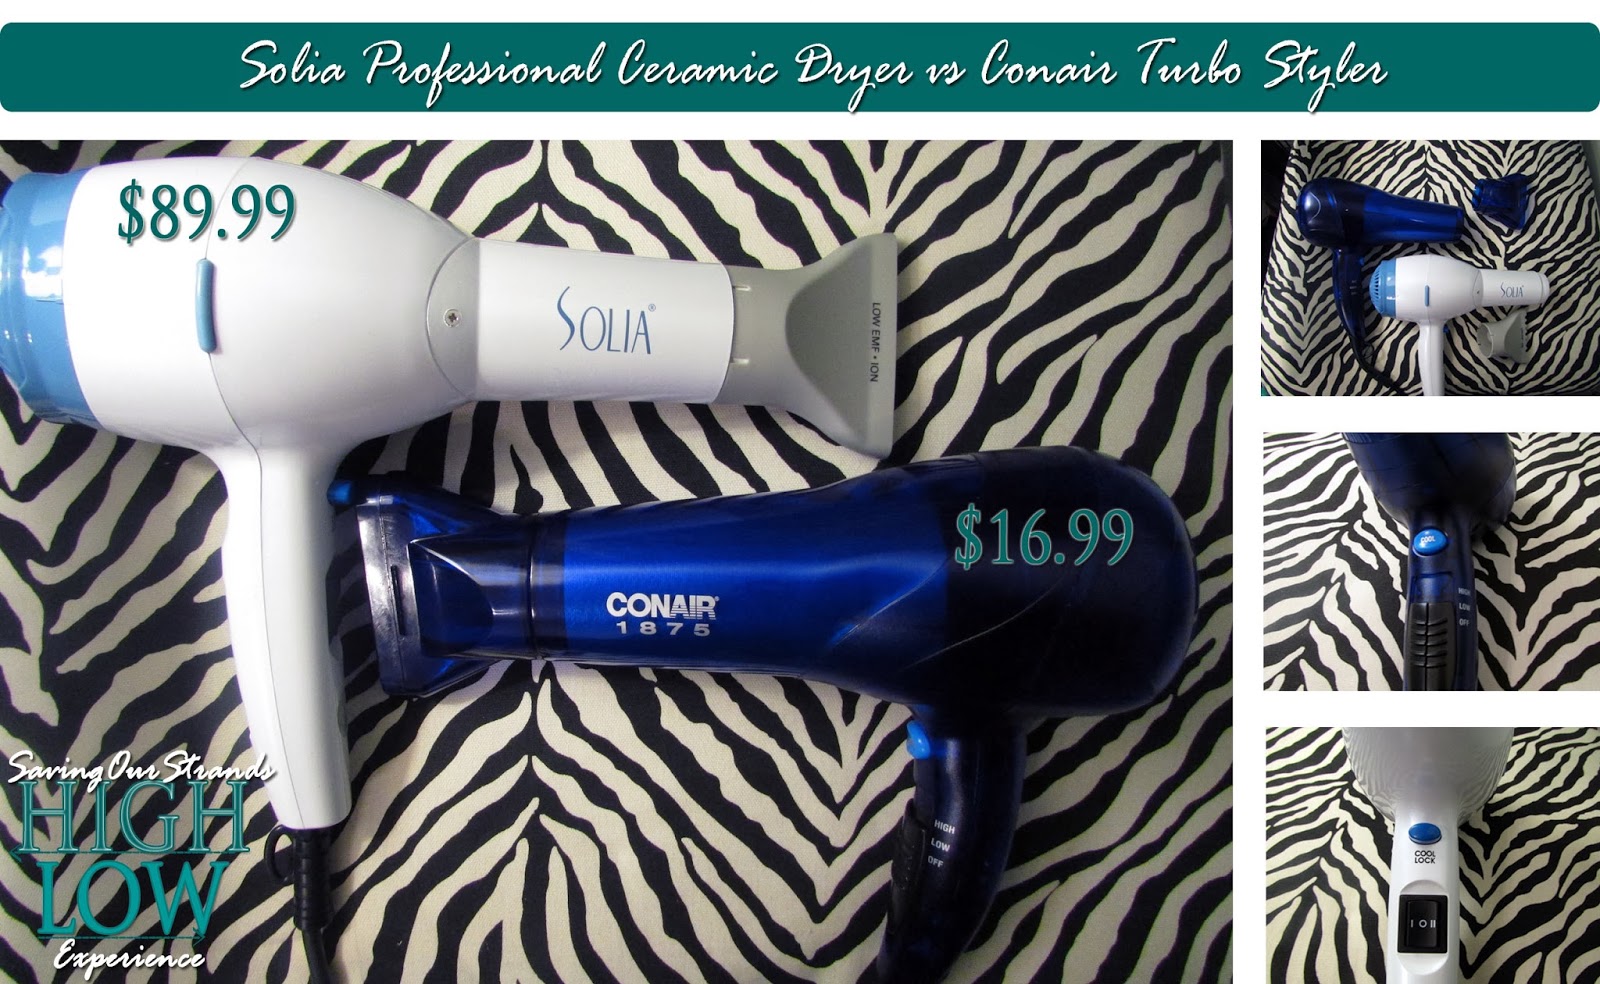
Solia Professional Ceramic Dryer vs Conair Turbo Styler | The High/Low Experience


Whilst, I'm a hair product connoisseur (that sounds better than product junky right?), I also love the thrill of finding a great bargain. Usually professional products are worth the money but sometimes, I wonder if the cheaper version would still get the job done. Thus the SavingOurStrands High|Low Experience was born. I'll review, compare, and contrast salon quality hair products versus their well priced affordable cousins to see which one does it best. First up---the Solia Professional Ceramic Dryer ($89.99) vs. the Conair Turbo Styler ($16.99). You can pick up both at Folica.com.

I purchased the Conair Turbo Styler a few years ago when my hair blower broke because it $16.99 and it had a nifty cool shot button lock. I most certainly didn't trust myself enough to purchase a high quality blower at the time (read: I didn't want to spend the money) because I dropped my old one entirely too many times. I also don't use my hair blower often enough to justify dipping into my savings. Still, I'm cheap and pretty picky (such a deadly combo right?). This is what I needed from my hair blower:
  • Lightweight- I need to be able to hold it for extended periods of time with one hand.
  • Lockable Cool Button- I only use hair blowers on cool so that it doesn't zap moisture from my hair.
  • Fast Drying Time- I usually air dry because its easy and helps my hair stay moisturized. So, if I'm using the blower it's because I'm in a rush.
Thus far, I've loved everything about the Conair. It's certainly light weight (at about 2 pounds), the cool button works perfectly, and I can dry my hair (in sections of course) in 15 minutes tops. A few weeks ago, I won an awesome VeryBusyMama giveaway that included the Solia Professional Ceramic Dryer. This thing is pretty cool. It retails for $89.99 on Folica.com, has ceramic ionic tourmaline infusion technology (whatever that means), and has the same cool shot button lock as my Conair. I used it to to dry my hair before flat ironing a few weeks ago and it was amazeballs. Since, I've had a couple of chances to use it on myself and my 100% natural haired prima. It's super lightweight---it weighs about a pound, I leave it on the cool lock setting and it dries my hair (in sections again) with lighting speed. This dryer checks off everything on my list.

Both of these blowers are excellent. It was extremely hair to find complaints:

Ease of use: 
Although the Conair is slightly heavier, The Solia's longer nozzle makes it a little harder to use on my own hair. I found it fairly awkward for me to hold by the handle to tension dry my hair.
Winner: Conair Turbo Styler 

Drying Time:
Using both blowers with low speed, the cool lock setting and concentrator nozzle focusing on my roots only, the Solia dries my hair super duper fast. Each section (I divide my hair into 5 sections) takes about 2 minutes to dry.
Winner: Solia Professional Ceramic Dryer

Smoothness:
Now this is seriously getting nitty-gritty. The smoothness that I achieved with the Solia vs the Conair was what set these two dryers apart. I don't know if the ceramic or the ionic or the tourmaline (I still don't know what any of that mess means) has anything to do with it but the Solia left me with smoother and softer hair. My Conair usually leaves my hair feeling moisturized but just not quite as smooth.
Winner: Solia Professional Ceramic Dryer

Price:
Well it's obvious that the Conair wins this one coming in at a whooping $70+ less than the Solia. Considering that I don't use my blower often the Solia is most certainly a spurge in the price per use category.
Winner: Conair Turbo Styler 

In my not-at-all-professional opinion the Conair Turbo Styler is an excellent substitute for it's pricer cousin the Solia Professional Ceramic Dryer. I had to really dig deep for ways to tell these two apart. 


Have your say. Which hair blower would you pick?


Besitos!
KLP

Saturday, February 15, 2014

Why I Love My Straightened Hair


The last time that I flat ironed my hair, I was convinced that my straight hair was out to get me. It got stuck on the clothing hook in my car, while it was down, I just knew that a spider was crawling on my shoulders, and I was constantly getting weave checked---by my family-friends! I just couldn't wait to wash my hair. However, this go around, I'm so in love with my straight hair. Here's why:

Easier detangling: I split my hair into a couple sections, gently finger detangle to remove shed hairs then moisturize and seal. Omgosh, not spending 20 minutes detangling, moisturizing and sealing is so dreamy.

Easier styling: Hello, updos, buns, and braids. My hair did exactly what I told it to do. I didn't have to worry about my edges or having to use a ton of tension to smooth my hair.

Easier Oops Coverups: It's been almost 2 weeks since I last washed. Ewww....I've got some icky oily gross hair. But, I've got errands to runs and thangs to do. So I've been sporting this threw a cute satin lined wool floppy hat. Shh...don't judge me. I'm washing later tonight! I promise.


I'm sad that my straight hair is leaving, but I'd be lying if I didn't miss my big hair! What do you love about your straight hair?

Besitos!
KLP

Tuesday, January 14, 2014

6 Tips to Stretching Your Relaxer 6 Months


I get asked almost daily how I stretch my relaxers for so long. Honestly, I've never thought about it. I've always been a serial relaxer stretcher. As a kid, I'd go months and months without relaxing. My mom is a total tom-boy, so she would only "do" our hair (meaning relax it) on special occasions. (Think: Mother's Day, Christmas, and birthdays) In 2013, my goal was to stop stretching past 4 months because of the breakage and general havoc that I think it caused on my ends. But here I am excited to be over 6 months post and loving (almost) every minute of it. Here are 6 ways that I've been able to stretch my relaxer 6 months:


Detangle Pre-Wash: Never, ever, never will you catch me jumping right in the shower without prepping my hair. I firmly believe in pre-wash detangling and a good oily pre-poo. The pre-poo is the place in your regimen to prevent tangles, manage breakage, and keep your hair on your head. I start by detangling using extra virgin coconut oil then when I'm feeling fancy, I'll add conditioner and little indirect heat.

Related: Why I Love Coconut Oil

Ditch the Shampoo: I try to like shampoo. I really do. But my hair hates it. The only shampoo that my hair digs is Matrix Biolage Hydratherapie Hydrating Shampoo so in the last few weeks I've been experimenting with creamy co-cleansers. You can DIY (here's a great recipe) or you can pick up a bottle of Curlicious Curls Cleansing Cream, this cute little co-cleanser that claims to hydrate whilst still cleaning your tresses.


Extreme Deep Condition: I first picked up on this brilliant deep conditioning technique via Carol's Daughter's Olive Oil Infusion. My Extreme Deep Condition layers an oil over your conditioner sealing in all that moisturizing goodness. To help the conditioner penetrate, I add heat via a heat cap for at least an hour. This stretch, I've taken things a step further by deep conditioning overnight. My hair usually feels like silk afterwards. Moisture overload is real so keep your hair balanced by...

Related: Why I Deep Condition Overnight


Use Protein to Maximize Retention: There's no secret that I use protein to maximize my length retention. Protein is a finicky topic for some, so here's my spill: I think that all types of curly hair can and benefit from protein. Yet with all things in life, how you put it together and what you use matters. Take some time and date a couple protein laced products. I'd start with a conditioner with protein closer to the bottom of the ingredient list then work your way up. One protein product that has benefited me from the very beginning of my journey is Chi Silk Infusion. Its silky, smoothing, and strengthening. Win, win, win!

Stop shedding: Its not uncommon to notice a bit more shedding (not to be confused with breakage) as you get deeper into your stretch. Nip it in the bud with green or black tea rinses and follow your favorite smoothing treatment (mine is Paul Mitchell Super Skinny Conditioner) or detangler (I can't get enough of Matrix Biolage Detangling Solution.)

Protective Style: I live in protective styles. Not braids or weaves but buns and updos. Its hard not to want to flaunt your ridiculously long hair, but trust me keeping your ends protected will slow breakage---a long term stretchers worse enemy.

Last but not least, its okay if you love your hair but don't have the patience to fiddle with months of detangling multiple textures. It's important to crawl before your walk. If you usually relax after 6 weeks. Then for your next stretch add one more week. Keep adding a week to each stretch until you've figured out your patience sweet spot then run with that.

What are your todo's for successful stretching?

Besitos!
KLP

Friday, January 10, 2014

How To Grow Out Your Bangs

The Evolution of My Bangs


Believe it or not, but I've never intentionally wanted bangs. Never not ever. But until recently, I've always had them. Why? I used to be a heat loving, don't even know what a deep conditioner is, hair abuser. The front of my hair was flat ironed at least once a day and sometimes two or three times depending on where I was going. I didn't even care that it seemed like my hair wasn't growing, all I cared about was that my hair was sleek and smooth. Then in 2012, I committed to growing out the crown of my hair. Today, my bangs are the longest they've ever been, inching towards shoulder length. Here's how I did it:

Protective Styling:
Shh! I have a secret: I have a thing for keeping my hair tucked up and away! Okay---that's a not so secret. I kinda talk about it a lot. I started protective styling when my son was born. The day that he was born, one of the very first things that he did was grab at my hair. I knew that was the beginning of the end if I didn't change my hair styling ways. Ha-ha! After 2-3 months of buns and updos (aka the inspiration behind The Bun Effect), I started to notice an immediate increase in the length of my bangs. Once I stopping fiddling with my bangs, I started retaining length.

Extreme Deep Conditioning:
I feel like the front of my hair is more exposed to the elements and manipulation than the back. So I take care to amp up the moisture by extreme deep conditioning. Extreme Deep conditioning layers an oil over the conditioner. Then cover with a plastic cap and warm under indirect heat for at least 30 minutes before rinsing with cool water. Dry hair is more susceptible to breakage and deep conditioning can help quench the thirst. Don't forget to keep a little protein in your hair care regimen. Here's how I use it to maximize my length retention.

Apply Your Products Thoroughly: 
When applying products, especially leave ins, start from the bottom and work your way up. Yes, your roots need moisture, but so do your ends. I noticed that when I start product application from the bottom, I'm more likely to apply evenly. For sealing (when I air dry), I go a heavier on the oil or butter on my ends to add an extra layer of protection.

There you have it, three super easy ways to retain length in your bangs. Any other tips to growing out your bangs?

Besitos!
KLP

Thursday, January 09, 2014

Zoe Saldana Milk Maid Twists | PINspired

Pinterest is the ultimate to go unleash your inner creative foodie, unique fashionista, and intriguing abstract artist. Of course, being all things hair obsessed, SavingOurStrands has hundreds of captivating and cute styles for you to be inspired by when that bun gets too boring. So, my girl Britt from One&20 and I are back to put a little pep into your protective style step with a monthly series recreating PINspired hairstyles on both relaxed and natural hair. 

PINspired Zoe Zaldana Milk Maid Twist
  1. Begin with detangled and moisturized hair. (My hair was previously cold air tension dried and faux banded to smooth my roots)
  2. Divide hair into two sections. (Optional: Leave a small section out to fame your face. I bantu knotted my bangs for a soft curl)
  3. Create two loose twists on each side (Four twists total). Start one of the twists at high level and the other near your ear. This will create the illusion of fuller twists. Pull the top twist over to the crown of your head and secure with a bobby pin. Do the same with the bottom twist
  4. Repeat on the opposite side.
  5. Pin until the braids feel secure.

Tips and Tricks:
  1. My hair isn't long enough. No sweat, either was mine. Which is why, I did two twists instead of one braid. The top twist stretches across to the opposite side, whilst the bottom twists "connects" from your ear up. Sneaky trick huh?
  2. My hair isn't thick enough. Create more twists! Try 3 or even 4 to get the illusion of a fuller thicker braid across. Remember to stagger them as you pin.
  3. My hair doesn't have enough volume. Consider air drying before beginning this style. An old bantu knot or braid out will give you the volume that you crave.  
Visit Britt over at One&20 for pointers on creating this style on natural hair!

What have you been PINspired by lately? Link up your faves below! (No sweat if it isn't hair related!)