Wednesday, March 30, 2016

5 Reasons Why Curlformers Are AWESOME! | The #WashDayExperience


The biggest reason that I caved and picked up Curlformers was because I wanted an easy way to stretch my hair so that I could work my hair into some of my favorite updos. I live for a simple, chic updo!

I also understand that this isn't everyone's motivation, especially when you see the price tag ($60USD+) for a curlformer kit. However, if for some reason I lost my kit today---I'd replace it in a heart beat. Here are 5 reasons why I don't even want to function without my curlformers:

SIMPLE INSTALLATION


Yes, there is a learning curve to using curlformers, but once you get into your own rhythm, they are stupid easy to work with. Honestly, I think that they are easier than magnetic rollers, perm rods, or even bantu knots because you're guaranteed a perfectly uniform curl every time. No fumbling with end papers, no worrying about even sections, and no wondering if you're twisting your hair in the right direction. I mean---the fact that they are color coded (one color for clockwise and another for counter-clockwise) makes installation easy peasy.

HEAT FREE

After spending years addicted to using heat to straighten my hair---I'm trying to stay as far away from direct heat as much as possible. I love that I don't have to use heat in order for my curlformers to set. Whether I install + air dry (4-5 hrs) or install + hooded dryer (30+45 mins), I can get the look of hot curlers, curling wands or flat iron curls without fear of burning my hair.

RELATED: 8 Tips for Sleek & Smooth Curlformer sets


SMOOTH & SLEEK CURLS

The best thing about Curlformers is that you can achieve a glossy curl from root to tip. The curls are glossy and moisturized. My hair feels smooth and bouncy.


GENTLE

My natural curl pattern is so tightly coiled that rarely do I get to see the full length of my hair without some sort of manipulation. Luckily for me, the gentle tension from the curlformer rod stretches my hair (without yanking it out at the root).

LESS TANGLES

And because my hair is in a stretched state, I've noticed that I have much less breakage from tangles. My hair stays moisturized longer from root to tip. I see less tangles/breakage from installing curlformers than I do for any other style that set recently (including a flat twist out and banding) 

Curlformers are perfect for relaxed girls who are trying to stay away from the heat and even for those of us who are transitioning because it blends all the textures in your hair SEAMLESSLY!

Do the results not speak for themselves? What are your tips for getting smooth and sleek curls?

Besitos!
KLP


Tuesday, March 29, 2016

[Review] Trader Joe's Tea Tree Tingle Conditioner


How ironic is it that in my minimalist regimen; I actually wash my hair more often? I wash my hair twice a week; a mid-week co-wash then a few days later I deep condition. I've been using Trader Joe's Tea Tree Tingle Conditioner to co-wash for about a year now and I'm madly in love with it. Here's why:

SLIPPAGE. This conditioner has some of the best slip of any conditioner that I've ever used (especially for it's stupid cheap price) First, I mist my hair with my DIY Moisturizer just to dampen my curls, then I apply this conditioner and my tangles completely disappear.

MOISTURIZING. Don't you hate it when a conditioner just sits on top of your strands refusing to soak in? Well you won't have that issue with this conditioner! It absorbs into my hair leaving my curls super soft and moisturized. I can't say that it could replace my deep conditioner by any means, but it's great for keeping my curls from getting dried out.

VERSATILE. I've used this conditioner as a pre-shampoo treatment, co-wash, and leave in conditioner. Because of the (mostly) organic ingredients, I'm not afraid to that it will dry my hair out or make my curls frizzy. 

STIMULATING. The tea tree + peppermint + eucalyptus essential oil combination makes my scalp giddy. Yes...I'm oh so serious! The tingly refreshing sensation keeps my scalp from rioting from all of my sweaty workouts.


RELATED: How I Cowash My Hair

The only downside of this conditioner is that it's exclusive to Trader Joe's stores. Which means that if you're not within a few miles of a Trader Joe's location then you'd have to grab it from Amazon.com (where it's more pricey)

And here are all of the official specs---just in case you're interested in all that mambo-jumbo:

Price: $3.99 USD

Purchased at: Trader Joe's and Amazon

Ingredients:
Water, Tea Tree, Peppermint Oil, Eucalyptus Oil, Nettle Oil, Thyme Oil, Birch Leaf Oil, Chamomile Oil, Clary, Coltsfoot Leaf, Yarrow Oil, Mallow, Horsetail Oil, Soybean Protein, Cetyl Alcohol, Vitamin E, Trace Minerals, Citric Acid, Sodium Hydroxymethylgycinate, Grape Seed

Promises:
Invigorate With Peppermint, Tea Tree and Eucalyptus Botanicals. 

Have you tried Trader Joe's Tingle Conditioner? What's your fave way to use it?

Besitos!
KLP

Monday, March 28, 2016

Volume Check


My hair is stupid dense.

Sometimes I feel like I have a million of the world's teeniest tiniest curls.

The changes that I've made in my regimen have made a world of difference in the way that my hair feels.


But does it look longer? Meh...not really.

When I found this picture from 2015; I had to really mediate on what indicators actually mark progress for my curls. Length is great, but it can't be the only factor worth considering.

My hair is probably 2-3x more voluminous than it was last year.

My hair is shiner, fuller and much more defined.

My ends clump and form these perfect little coils.

My hair has evolved and I think that it's time for my mindset on progress to evolve too because all of this volume and definition is giving me LIFE.

So I'm wondering, should I start doing volume checks in addition to length checks?

Besitos!
KLP

Wednesday, March 23, 2016

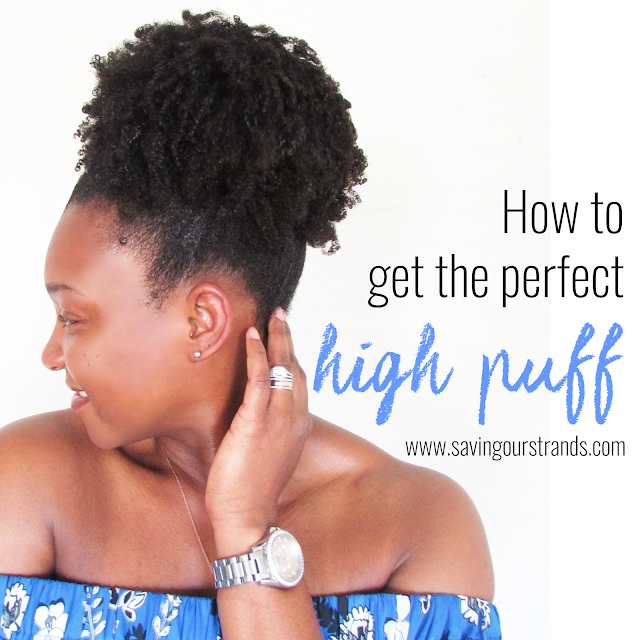
How To Get The Perfect High Puff on Natural Hair

www.savingourstrands.com


In honor of lazy day hair style week, I'm sharing with you guys my laziest boringest style ever:

The high puff.

www.savingourstrands.com


Yes, yes, I know that I swore off my high puffs in my Worse of 2015 list. But...

I just can't quit it.

This must be what Cookie Monster feels like when he goes on a diet...


The good news is that I figured out a way to rock my worse/best style without damaging my hair (so far).

But first, I had to promise myself was to never NEVER...

Like ever...


Go more than a day without re-moisturizing my curls.

I'm just so prone to laziness...


www.savingourstrands.com

Anywhos---here are my secrets to the perfect high puff:
  1. Start with stretched hair- My hair was previously stretched using curlformers.
  2. Moisturize- I lightly mist my hair with my DIY Hair Moisturizer and applied my favorite leave-in conditioner.
  3. Seal with a oil or butter- Because I know that my ends dry out fast, I liberally added this hair butter to my ends.The butter also defines my ends so that they don't get tooo frizzy.
  4. Lay your edges- I'm not much of an edge control girl, but when I wear a puff, I like my edges neat and laid. Today I used a little Curls Blueberry Bliss Curl Control Paste.
  5. Gentle metal free extra wide hair tie- my secret to a giant high puff is to center it at the very top of my head with an extra wide hair tie. The density of my hair keeps the hair tie in place without it being too tight. This is my current fave hair tie.
Viola. My stupid easy uber lazy high puff!

www.savingourstrands.com


What's your lazy day style? Share the dets in the linkup collection below!


Tuesday, March 22, 2016

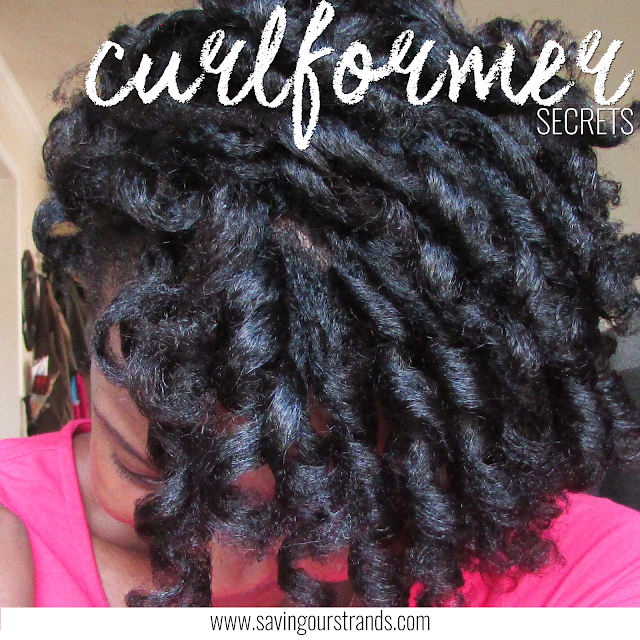
My Curlformer Secrets

www.savingourstrands.com)


I'm totally in love with Curlformers! I've used them practically weekly for the last 3 months. They're perfect for stretching my hair, which allows me to keep my hair moisturized root to tip. Plus curlformers make it super easy for me to work my hair into some of my favorite updos.

There is definitely a learning curve for using your curlformers, but once you get into your own rhythm, they are really easy to work with. Here are a few tips that I've picked along the way:

CHOOSE YOUR CURLFORMER

Curlformers range in size and curl type. So far, I've only used the (Pink and orange) Extra Long and Wide styling kit. I choose this kit because it was cheaper than buying the rollers + hook separately. The extra long kit also will allow me to keep using the rollers as my hair grows out. Currently my hair fills about half of the roller. I'm considering picking up the Extra Long and Narrow (blue and green) kit one day---you know when I hit the lottery or something like that.

WET HAIR

I almost never do anything in soaking wet hair---except install my curlformers. The results are sleeker, smoother and shiner than when I set on nearly dry hair.

CURLFORMER COCKTAIL

This is the only time that I'm strict about order of operations-- Moisturizer +Oil/Butter + Holding product--is the key to gorgeous curls that last. Use what your hair likes but just be sure that the products that you use together like each other. Some moisturizers don't like some oils and some holding products loose their minds when compounded with some moisturizers. Which will cause flakes. Date a few cocktails until you find one that you like. My current fave for long lasting curls is  Jessicurl Too Shea Extra Moisturizing Conditioner, my Tangerine Vanilla Whipped Hair Butter and Shea Moisture Curl Enhancing Smoothie. I won't lie tho, I usually skip the holding product unless I plan on wearing my curls out and about. My goal with curlformers is simply to stretch my hair without direct heat.

SECTIONING

In the beginning, the hardest part to figure out is how to section your hair so that the curlformer will slide onto your hair without snagging all while dry in a decent amount of time. I like to first divide my hair into 4 sections (2 in the front and 2 in the back) and apply all of my leave ins. Then further divide those larger sections into 10 pieces. This way I'll have enough curlformers for each section.

DETANGLING

The better detangled your hair before installation, the sleeker that your curls will be. I prefer to finger detangle my smaller sections, then get the curlformer and hook prepared for installation. I tried using a denman brush once---but in the end, I felt that it was too much manipulation on my curls. Finger detangling definitely gets the job done.


DOUBLE THE CURL

I love my curlformers but I have no intentions on buying more if I don't have to. So in order to get more bang for my buck, I two-strand twist my sections before installing the curlformers. This sneaky little technique create two curls instead of just one without having to divide the curl after they set. It also gives your hook somewhere to latch onto so that it doesn't snag your hair. 

DRYING TIME

The first 2 times that I installed curlformers, I slept in them and it was the WORSE idea EVER. It was awkward, absolutely uncomfortable, and I didn't sleep at all. Because I loved the results, I knew that I'd need a better way to dry, so I invested in this dryer from Sallys. It was a bit on the expensive side but absolutely worth it! Now my drying time is 45 minutes, the dryer is quiet, and I'll NEVER have to sleep in curlformers again. The best part is that my curls are actually glossier when I use my hooded dryer than when I let them air dry. Removing your curlformers before they're dry will completely ruin the curl so allot enough drying time.

FLUFFING

When I do wear my curlformers out, I usually don't divide the curl any further. I do fluff my roots using my fingers to get rid of those parts. Then I use a pick, only at my roots for a little volume.


There you have it---my secrets to super smooth curlformer curls. Do you use curlformers? What are your tips and tricks for a fabulous set?

Besitos!
KLP

Monday, March 21, 2016

What To Do When Your Favorite Relaxed Hair Blogger Goes Natural


Your favorite hair blogger is totally your friend in your head. Y'all share hair secrets. She comes to you when she's frustrated or overwhelmed. You encourage her when she has a setback. Y'all are brutally honest with each other and transparency is the only way that y'all roll.

Then she has the NERVE...

AUDACITY...

LOS COJONES...

To decided to stop relaxing her hair.

How rude?!?


You might feel betrayed. Y'all were supposed to be in this together. Things will get a little awkward for a minute. But before you comment on her "Big chop" or "I'm transitioning" post, remember these 3 tips:


W O O S A H

Just breathe. Remember that it's just hair. And if our goal is to have healthy hair then does it really matter if it's healthy chemically straightened hair or healthy curly hair? We're still in this together rooting for the same outcome.


I T ' S   N O T   P E R S O N A L

Her decision is for her. She's not asking you to follow suit. She's not even asking you to agree. But she is asking for you to respect her decision. There are so many reasons why women stop chemically straightening their hair. Some are as simple as they want a change and others are deeply spiritual, political, or emotional. She loves her readers and of course she's thought about how it would change the content of her blog---yet she still made this choice for herself. After all, hate to say it but---it's kinda not about you. So continue to do you boo!


E N C O U R A G E

This cute little community of healthy hair lovers was totally built on encouragement, support, and positivity. We have enough decisiveness in our world that the way that you choose to style your hair shouldn't be one of them. We can still affirm each other even when our journeys don't exactly mirror each other. 

If we're honest with ourselves, this natural vs relaxed debate is old, tiresome and just plan lame. We have more in common with each other than we have differences.

The same tips apply if your favorite natural hair blogger announces that she's gonna relax her hair too!

Let's give our hair bloggers some love! Link your faves below and list if they are natural, relaxed or somewhere in between!


Wednesday, March 16, 2016

[Hairstyle] Curly Upsweep for Natural Hair | The #WashDayExperience


I ditched my Curlformers this week to start testing out styles for our upcoming family photo shoot. Ay dios mio, our pics from last year were EVERYTHING and more to me---but I'm kinda thinking that I want to try something different this year. Give me a shout if you have suggestions!


Here's what I used during this #WashDayExperience:

Pre-shampoo/Strengthening Treatment- DIY Moisturizing Mist (tutorial here) + Aubrey Organics GPB Conditioner (review here)

Clay Rinse- Here's the dets on my recipe

Deep Condition- Jessicurl Deep Treatment Conditioner (review here)
Leave-Ins- Extra Virgin Coconut Oil (Why EVCO is AMAZING here) + Jessicurl Too Shea Conditioner (why I love this stuff here) + Camille Rose Twisting Butter (shop it)

RELATED: My Minimalist Natural Hair Regimen

And here's how I did it:


This week's #WashDayExperience is all about deep conditioning hacks, so started with one of NEW favorite hacks: warming up the conditioner.

First, I spritzed the ends of my hair with my DIY Moisturizing Mist (tutorial here). Then I slathered my hair in warmed Aubrey Organics GPB Conditioner (review here) as I detangled. I love this conditioner because it helps makes breakage disappear, defines my curls and it has a TON of slip. This is what my shed hair after detangling looked like:


Hopefully I can continue this breakage-free trend that I have going here! I let the conditioner sit for about 20 minutes before I hopped in the shower, rinsed the conditioner section by section then applied my Clay Rinse with a narrow tip applicator bottle. I'm still on a mission to get the curls in the front of my hair to clump as well as the curls in the back. Fingers crossed that consistency will do the trick!


Next, I deep conditioned with my all time fave conditioner Jessicurl Deep Treatment Conditioner (review here), coated my ends in Extra Virgin Coconut oil to seal in the conditioner (which is another deep conditioning hack!) and plopped under my hooded dryer for about 30 minutes.


Instead of curlformers, this week I attempted a flat twist out. Have you ever started styling your hair and then about half way into it you KNOW that you made a critical error? Yeah...that was me. I knew that my flat twist sections were too small but it was too late for me to turn back. I put a couple of perm rods on the ends and reminded myself that I could always rock a curly puff.

*le sigh*

Anywhos, the next morning, I unraveled my hair.

It wasn't soooooo bad---more texture than I wanted.

Not as voluminous as I was expecting.


Yerp. Up it went into this quick curly upsweep. At least my bangs looked marvelous dah-ling!

I'm definitely going to try again---with bigger sections and I'll probably ditch the perm rods. They had the ends of my curls looking all kinds of cray cray!


How was your #washdayexperience? Share your style this week and your favorite deep conditioning hacks with our healthy hair tribe!

Besitos!

KLP


Tuesday, March 15, 2016

4 Ways To Make Deep Conditioning Easier


I love deep conditioning my hair. I know that my curls CRAVE moisture and I know that moisturized hair retains length. Like--what is there not to love about deep conditioning---except how long it can take. So here are 4 ways to make your deep conditioning session a little quicker and easier!

T E M P E R A T U R E

Hooded dryers, heating caps, and steamers are all fantastic heat sources to allow your fave deep conditioner to absorb into your strands but who really wants to sit under them? Next time that you deep condition, try warming your conditioner first then apply it to your hair. According to JC (healthy hair scientist) at Natural Haven, applying warm conditioner to your hair is just as effective as the other heat sources---but it's soo much easier!

D E E P   C O N D I T I O N   O V E R N I G H T

I get fried every single time that I say this, but it's my truth: I deep condition overnight. *gasps* I discovered this technique by accident---I fell asleep with conditioner in my hair---and I adore it. Over moisturizing is real; however I can  honestly say that this technique has done wonders for my hair. It also saves me time and keeps my hair more moisturized longer (even without daily moisturizing/sealing. 

L A Y E R   W I T H   O I L

I first picked up on this brilliant deep conditioning technique via Carol's Daughter's Olive Oil Infusion. I layer an oil over my conditioner to seal in all that moisturizing goodness before I cover my head with a plastic cap. Every single time, my hair feels like silk afterwards.

RELATED: How I Prevent Breakage in my Natural Hair

U S E   P R O T E I N

Protein conditioners keep my curls balanced, soft but strong, and thwarts breakage on my ends. My I use this cult classic from Aubrey Organics as a pre-shampoo treatment on my ends about once a month to balance out my moisture usage. However, I'm considering using henna in the future. Strong hair plus subtle color? Seems like a win win to me! 

What's your secret hack for making deep conditioning easier? 

Besitos!
KLP

Wednesday, March 09, 2016

[Tutorial] Curlformer Side Bun + Double Dutch Braid Bun | The #WashDayExperience


They say that too much of a good thing is bad---and I'm guessing that applies to your hair too.

I co-washed by hair about 3 days after last week's #washdayexperience and afterwards I noticed that I had a couple places in my hair with some yucky build up at the roots.

So I grabbed my fave shampoo this week to give my scalp a thorough scrub.

Here's what I used:


Pre-shampoo- DIY Moisturizing Mist (tutorial here) + Herbal Essences Hello Hydration Conditioner  (review here)
Shampoo- Jessicurl Cleansing Shampoo (review here)
Clay Rinse- Here's the dets on my recipe
Deep Condition- Jessicurl Deep Treatment Conditioner (review here)
Leave-Ins- Extra Virgin Coconut Oil (Why EVCO is AMAZING here) + Jessicurl Too Shea Conditioner (why I love this stuff here) + DIY Hair Butter (tutorial here)

RELATED: My Minimalist Natural Hair Regimen

And here's how I did it:


This week's #WashDayExperience theme is Detangling tips. I always detangle my hair before I hop in the shower. When I don't---my hair hates me. To get started, I spritzed the ends of my hair with my DIY Moisturizing Mist (tutorial here). Then I slathered my hair in Herbal Essence Hello Hydration (my full review here) and detangled my hair in small sections. My detangling process takes about 15-20 minutes. I let the pre-shampoo treatment sit for about 20 minutes before hopping in the shower.

RELATED: My 5 Steps to Detangle FAST!


In the shower, I rinsed the conditioner section by section then applied my Clay Rinse with a narrow tip applicator bottle. This week, I started the application from front to back. My curls in the back are completed defined from root to tip. So I started with the front to give these curls some more love. Fingers crossed that I can get the curls in the front to POP like the ones do in the back!

Next, I deep conditioned with my all time fave conditioner Jessicurl Deep Treatment Conditioner (review here), coated my ends in Extra Virgin Coconut oil (here's the kind that I use $) to seal in the conditioner and plopped under my hooded dryer for about 30 minutes.

RELATED: Why I'm in love with the Coco (Coconut Oil of course!) 


I t-shirt dried for about 10 minutes then installed Curlformers using a little more Extra Virgin Coconut Oil + Jessicurl Too Shea Conditioner (why I love this stuff here) + DIY Hair Butter (how to make your own Hair Butter here) as my leave ins.


I sat under the dryer for an hour then took down the curlformers and tossed my hair into a side bun.


I thought about doing something more glamorous the next day.

But I just didn't feel like it.


So into my staple Double Dutch Braid Bun the curls went. Aside from a simple ponytail--has been my favorite workout style since my relaxed days. You can check out more of my workout styles here. 

What are your detangling tips and how did you style your hair this week?


Tuesday, March 08, 2016

5 Steps To Detangle Your Natural Hair Faster


Detangling your hair doesn't mean ripping it out, spending hours haunched over in the shower or having to cut out huge knots. I noticed that the better I get at detangling my hair, the better my curls clump, the easier it is to style, and the better products seem to absorb into my curls. Here are my steps for detangling my crazy thick curls:


P R E - W A S H

I've found that detangling before I wash is the best way to identify and remove tangles before they turn into large knots. Detangling before I wash makes my wash day faster and gives me less work to do in the shower. 


S L I G H T L Y   D A M P

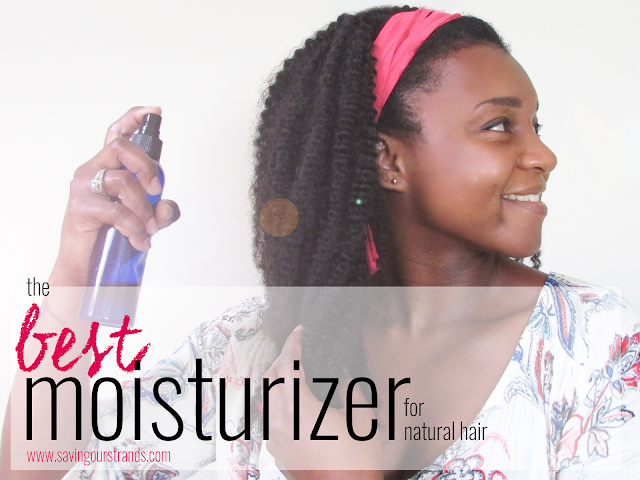
I start my spritzing my ends with this DIY Moisturizer. It only has 4 ingredients and it works like a charm to re-hydrate and soften up my curls. At this stage---you're not gonna want to completely saturate your hair; especially if you have super dense curls because they will just shrink up on you. (Side note: A plain ole mist of water will do the trick too.)

Related: The BEST Moisturizer for Natural Hair (and it's cheap too!)

S M A L L   S E C T I O N S

Gently divide your hair into several sections. I usually start with 8; 4 in the front of my hair and 4 in the back. Then I further divide these sections into 2 parts then apply a little conditioner to my ends before using my fingers to detangle.


F I N G E R S   O N L Y

Your fingers are the best tools for detangling your hair. You can feel for knots and unravel them inside of ripping them out. Your hands will create less friction  and it gives you the opportunity to really get to know where your hair tangles the most. I've found most of my tangles at the ends of my hair vs the roots and the middle of my head is usually more tangled than the back or the front. This reminds me to keep that section of my hair better moisturized between washes.

My method is pretty straight forward: I take the section, stretch it out with my fingers and rake downwards to remove shed hair. If I encounter a tangle, I isolate it and pick it apart. For those pesky single strand knots---I just grab my scissors. Ain't nobody got time for that!

While it's basically impossible to eliminate single strand knots, I have noticed that I have less knots, tangles and splits now that I'm sticking to my minimalist hair regimen.

Oh and if you just have to use a tool--try this amazing seamless comb.

Related: Detangling Comb From The GAWDS!

K E E P   S T R E T C H E D

After you've detangled each section twist, braid or bun the section to keep it stretched and tangle free.


What are your secrets for detangling your hair?

Besitos!
KLP

Wednesday, March 02, 2016

[Tutorial] Swirled Flat Twist Bun for Natural Hair | The #WashDayExperience


My curlformer curls from last week went into bun. *curse you spring allergies!* I co-washed as usual and put my hair in a high puff until today's #washdayexperience. Because I'd left my poor ends to dry out---I tweaked the regimen that I've been sticking to just a little but kept the products exactly the same.


Here's what I used:

Pre-shampoo- DIY Moisturizing Mist (tutorial here) + Herbal Essences Hello Hydration Conditioner  (review here) + Extra Virgin Coconut Oil (Why I 💕 EVCO!) + My Stimulating Essential Oil on my scalp
Clay Rinse- Here's the dets on my recipe
Deep Condition- Jessicurl Deep Treatment Conditioner (review here)
Leave-Ins- Extra Virgin Coconut Oil (Why EVCO is AMAZING here) + Jessicurl Too Shea Conditioner (why I love this stuff here) + DIY Hair Butter (tutorial here)

RELATED: My Minimalist Natural Hair Regimen

And here's how I did it:


This week's theme is Dry Scalp Remedies, so I started by applying my Stimulating Essential Oil (Here's how to make your own) to my scalp. I've used this blend for years and its my favorite cure-all. The essential oil blend soothes itchiness whilst the oil relives dry scalp. Plus it smells divine!

RELATED: 4 Ways To Fight Dandruff and Flakes

Next, I spritzed the ends of my hair with my DIY Moisturizing Mist (tutorial here). Then I slathered my hair in Herbal Essence Hello Hydration (my full review here) and sealed my ends with a little coconut oil. Because my ends felt drier than usual, I covered my hair with a plastic bag and went to sleep.

RELATED: Why I Deep Condition Overnight

An overnight pre-shampoo session was EXACTLY what my hair needed because in the morning, my hair was crazy plump, soft, and uber moisturized! Next, I hopped in the shower, rinsed the conditioner section by section then applied my Clay Rinse with a narrow tip applicator bottle. I usually start my application process from back to front and I noticed that the curls in the back of my hair are completed defined from root to tip. So, next week, I plan to start the application process from front to back so that my curls in the front can get more clay love.


Next, I deep conditioned with my all time fave conditioner Jessicurl Deep Treatment Conditioner (review here), coated my ends in Extra Virgin Coconut oil (here's the kind that I use $) to seal in the conditioner and plopped under my hooded dryer for about 30 minutes.

RELATED: Why I'm in love with the Coco (Coconut Oil of course!) 


I t-shirt dried for about 10 minutes then installed Curlformers using a little more Extra Virgin Coconut Oil + Jessicurl Too Shea Conditioner (why I love this stuff here) + DIY Hair Butter (how to make your own Hair Butter here) as my leave ins.


I had to run grab the minions from the bus before I could figure out how I wanted to style my hair so I threw my curls up into a banana clip.


When I got home, I decided on this Swirled Flat Twist Bun.


Here's how I did it:
  1. Begin with stretched hair (I stretched my hair using Curlformers.) 
  2. Pull all of your hair to one side. I chose the left side. Then secure with a hair clip.
  3. Take a small section near your left ear and section it off. We'll work with it later.
  4. Now grab a small section of hair near your right ear and begin your flat twist. This twist will end near your temple. 
  5. Begin another flat twist directly behind the first one.
  6. Incorporate the first twist into the second twist.
  7. Then flat twist along your hair line until you reach your left ear.
  8. Then start to curve your flat twist towards your right ear. This will create the swirled effect.
  9. Continue flat twisting until you reach the nape of the right side of your hair. Double strand twist your ends. 
  10. Release your remaining section. Divide it in half. 
  11. Then double strand twist each section.
  12. Cris-cross the last two twists and secure the ends into a bun.  

Optional: Polish the look by smoothing your edges with little edge control. I used Curls Blueberry Bliss Curl Control Paste.


I'll wear this style for 2-3 days before I co-wash and bun my hair for the rest of week.

What are your remedies for a dry scalp? Share all the dets in this week's #WashDayExperience link up below!

Besitos!
KLP


Tuesday, March 01, 2016

March #WashDayExperience Themes


Back by popular demand! Your March #WashDayExperience Themes!

*cue the Price is Right happy dance*


You guys told Jen and I that you loved the themes from January so we decided to bring them back for March!

W H A T   I S   T H E   # W A S H D A Y E X P E R I E N C E?


Let me back it up a second. The #washdayexperience is a place for ladies who are striving for healthier hair to share the hows, whats, whens, and whys of their weekly wash day ritual. It doesn't
matter what state your hair is in: natural, colored, relaxed, texlaxed, curly, straight, or loc'd---ALL ARE WELCOME. You may share via blog/vlog, Insta, G+, Twitter, and Facebook.

# W A S H D A Y E X P E R I E N C E   T H E M E S


Wash day can be monotonous and uninspiring at times. So Jen and I created a few themes to spice it up a bit. Here are your themes for March:

Week 1: Dry Scalp Remedies
Everyone has a DIY, beloved product, or method to cure dry itchy or flaky scalp so why you keeping it to yourself?!?

Week 2: Detangling Tips
Do you detangle whilst your hair is wet, damp or dry? Do you start from the roots or the ends? What are your favorite detangling tools?

Week 3: Deep Conditioning Hacks
Do you use a steamer, heat cap or hooded dryer? Do you deep condition on dry hair or freshly washed hair?

Week 4: Fave Lazy Day Hairstyle
What are your go to lazy day hair styles? Are you a bun and go kinda girl or do you have some gorgeous-looks-intricate-but-its-dumb-simple-style?

HOW TO JOIN THE # W A S H D A Y E X P E R I E N C E


Our look might have changed over the last year, but the rules for all this positivity are still the same:
  1. Share the direct link to your #WashDayExperience linkup. We go live every Wednesday.
  2. Add the #WashDayExperience badge to your post
  3. Give the chica that linked up before you a little comment love. 

Stupid easy! Will you join the madness? Share a link to your blog below!

Besitos!
KLP

PS: The themes aren't mandatory---just a way to have a little more fun! Si que claro, you can join without adhering to the themes!