Showing posts with label PINspired. Show all posts

Saturday, March 07, 2015

[Hairstyle] Wedding Hair Inspiration


Hola Chicas! 


I am in the midst of planning a wedding! Ahhhh... It is getting quite real! :P I wanted to share a few of my bridal hair ideas and see if you all had any more ideas for inspiration. 

Here is a little information about wedding! It will be rustic and elegant. I am having a late August wedding with a outdoor ceremony/cocktail hour and our reception within a lodge that looks like a "log house" with a GORGEOUS fire place. A lot of things are DIY so this summer will be quite busy! hehe 

My fiancĂ© Mark was born and raised in Hawaii, so I will be wearing a traditional Haku Lei (flower crown) over my head and he will be wearing a Ti Leaf lei. These are meant to ward off bad spirits and to further bring happiness in our marriage! :) And they look gorge! So, naturally, I have some ideas... Check them out! 


1. Braided Crown with Flowers -- I think this style is gorge! I think it would definitely fit my face and my dress. The Haku Lei would also fit perfectly atop my head in this style or it can even be worked through my hair. 


2. Long Side Loose Braid  -- This would also be quite lovely. However, I am worried about my hair making me hot if it is on my neck the entire time. But it has a nice flow to it! 


3. Knotted Side Swept Up-Do - Again, the Haku Lei would fit perfectly atop this style. I think it goes lovely with my dress and envisioned jewelry. I also think that it will not make me hot with this and actually help keep me cool. 


These are my top inspirations and ideas for my wedding day! If you have some, let me know! Here is my dress so you get an idea of my style... :D CAN NOT WAIT FOR MY FITTING!  
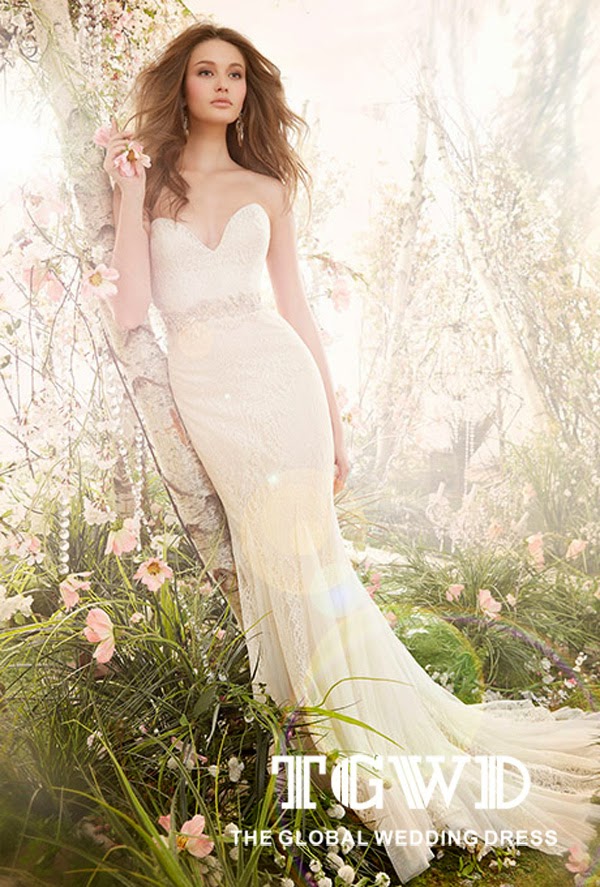


Let me know your thoughts and ideas! 

xoxo
Keyda


Friday, August 29, 2014

The Best Fit-spiration Pinterest Boards | #FitnessFriday

I'm kinda sorta addicted to Pinterest---especially for fitness inspiration. I love uncovering inspirational quotes, ways to shake up my workout routine, and literally laughing out loud at fitness funnies. Check out my best of the best in Pinterest Fit-spiration:


Brooklyn Active Mama
Nellie's sassy sense of humor translates from her fabulous fitness blog to her hilarious fitness funnies. If you need a fitness related giggle---she's your girl!


Les Astuces De Margaux
Margaux is an imaging French lifestyle/beauty blogger with a distinguishing eye for positivity radiant fitness affirmations.


Ok Dani!
Dani is genuinely dedicated to increasing her wellness---and yours too. She a mom of 2, wife of 1, and beach body fanatic. I adore the fitness motivation that flows from her on Pinterest.


It's your turn! Who do you follow on Pinterest for Fit-spiration?


Besitos!
KLP

PS: In other news, #FitnessFriday will be under construction for a few weeks. We've got some ridiculous awesomeness planned to share with you guys to spice it up a bit. So definitely stay tuned for more information. In the meantime, you can still link up with either my blog bestie Ebony from www.longing4length.com or myself on Fridays! 


Thursday, May 15, 2014

Wash Day | Keyda


Hola Chicas!

So, this was going to be a pretty normal wash day but as I walked thru Target....you know what happened lol.. I ended up with some new goodies :) I shall be reviewing!

[A] Detangled with my fingers then my Magic comb! Just to be sure there were not tangles...

[B] Prepoo with Oyin Honey Hemp Conditioner through my hair. I made sure to put attention to my roots and work through my ends. I did not want to put an excessive amount so I lightly moved it through my hair.  -- I honestly could have stopped after this point.

[C] Cowash with AS I AM Coconut Cleansing Conditioner -- and I was not a huge fan :/

[D] DC with my saving grace, Halka Baba de Caracol and sat under some heat for roughly 1 1/2 hour. Yummy!! My hair was sooo soft and manageable.

[E] Tea Rinse with Black Tea! [F] Lightly sprayed Nexxus Root Mist for my leave-in and rubbed a little Peppermint Hair Butter through my hair. I also put some Phillip Kingsley Scalp toner through my scalp.

Air Dried for roughly 75%
Wrapped Twists 

PINspired: Wavy Twist Out

Back of Twist Out
1) Twisted hair in sections.

2) Wrapped the twists around my head. Securing with pins. -Went to bed!

3) Vaalaa... Once I took out the twists, I had beach waves! ahah!

To keep my style lasting, I moisturized and sealed my hair into bantu knots for remainder of the week! bonita!

PINspired by Daily of dailycurlz.com

Hair Reality:

I absolutely love LOVED my hair this week. Need I say more...


How was your wash day experience!?

xoxo

Keyda


Thursday, May 08, 2014

[Hairstyle] Goddess Braid Styles

KLP and I love braiding our hair into up-dos or other classic styles. We especially HEART goddess braids. They are simple, easy, and quick, plus they're fun and flirty for the summer. Who doesn't love a sassy protective style? We like to jazz it up with a curly bang or even swirl the ends into a bun. Here's how we do our goddess braid:

How To Do A Goddess Braid: 


  1. Begin with detangled and moisturized hair. KLP's Tip: "Starting on an old bantu knot set gives your braids added fullness"
  2. Divide your hair in half. Deep side parts flatter all faces in this style. Keyda's Tip: Leave a small section out to fame your face.
  3. Start your dutch braid at the front then braid away from your face. Stay close to your edges and braid all the way down to the back.
  4. Repeat on the other side. KLP's Tip: Fluff your braid by picking it apart a little.
  5. Cross the two braids in the back and secure them with bobby pins. Keyda's Tip: Add a bow or headband to accessorize.
Once you get the braid down, this style literally only takes 5 mins or less! This style is all over the red carpet. Our hair muse Tracee Ellis Ross is famous for them! 


Do you do Goddess Braids? What are your tips for perfection? 
Besitos! 
XOXO
Keyda

Thursday, April 24, 2014

Wash Day | 6 weeks post {keyda}

Hola Chicas!


I have been enjoying a few new products in rotation within my hair regimen. I have been really pushing to maintain my regimen without falling to my stresses of work....and just laziness! Wish me luck! :)

[A] Detangled with my fingers at the root and with my magic comb! I had 2 knots :( but I did not sleep with my hair wrapped on vacay lol ...just wanted to indulge myself!

[B] Pre-shampoo with my essential oil mix on my scalp and EVOO on the length of my hair.

[C] Co-wash with Herbal Essences Hello Hydration Moisturizing Conditioner.

DC
[D] Protein Treatment with Aphogee 2 Step Treatment. I am not a fan of the smell but I also like to use ALL of a product before purchasing a new product. I actually put my head under some heat for 10 minutes with the product in. I really wanted the protein to get in there!

[E] DC with Shea Moisture Deep Treatment Masque. This is a new product that is in rotation. I actually really like it so far. Also placed Chi Silk Infusion over my entire head. Stayed under heat cap for an hour.

[F] Black Tea rinse with a dab of Paul Mitchell Super Charged Moisturizer.
[G] Air dried my hair about 80% then spraying Aphogee Keratin and Green Tea Restructurizer all over and a dab of Koils by Nature Perfectly Peppermint Hair Butter through my hair.


My Hair Reality:

My hair felt strong and moisturized fully! I was very pleased with my wash day experience and just hope I can keep up with my moisturizing/sealing through out the week. I decided to braid my hair after being pinspired! It is a simple Crown Braid! I have been able to accessorize this style so easily and barely touch my hair...win! Now, I must admit that has spring approaches my scalp has been needing more taming. I am hoping that I keep the irritation and flakiness at bay with my tea rinses and essential oil mix! Wish me luck! Sad news... I have no more argan oil :( ....it is soooo expensive...so I will probably use grape seed oil until I bring enough change lol for my argan oil!


Check out our wash day experience! How was your wash day!?

xoxo
Keyda


Thursday, March 13, 2014

[Hairstyle] Dutch Side Mermaid Braid | PINspired

Pinterest is the ultimate to go unleash your inner creative foodie, unique fashionista, and intriguing abstract artist. Of course, being all things hair obsessed, SavingOurStrands has hundreds of captivating and cute styles for you to be inspired by when that bun gets too boring. So, I'm putting a little pep into my protective style step with a monthly series recreating PINspired hairstyles.

PINspired Hair Romance Dutch Side Mermaid Braid
  1. Begin with detangled and moisturized hair. I did this style on an old bantu knot set. (Optional: Leave a small section out to fame your face.)
  2. Start your dutch braid at the crown of your head. Continue braiding on the right side only until you get to your ear. Finish the braid and secure with a small hair tie if necessary.
  3. Fluff your braid. To get this big dramatic braid, you need to gently pull at the sides of your braid to widen it.
  4. Pull the rest of your hair over to your ear and dutch braid to the ends. Secure both braids together with a small clear hair tie.
  5. Secure the braids together using bobby pins so they look like one large braid.
 Tips and Tricks:
  1. My hair isn't thick enough. No worries. Make your braids tight. Then pick them apart a little at a time to create the illusion of a fuller braid.
  2. My hair has too much texture. Start the style with stretched hair. I usually go for bantu knots but a old braid/twist out would work just as well. 
  3. My hair hates hair ties. Yes---I know hair ties---plastic elastics---they're all inventions of the devil. Here's some good news. Because my hair was already curled at the ends, I simply twisted them together and used a hair pin to secure. No hair tie required!
Visit Britt over at One&20 for pointers on creating this style on natural hair! Who knew that mini twists were so versatile? I'm secretly jealous!


What have you been PINspired by lately? Add a link to your fave below. (Even non-hair related links are perfectly fine!)
 
Besitos!  
KLP


Saturday, March 08, 2014

Vintage Hair: Rolled bang + Low bun | Pinspired

Vintage Rolled Bang + Low Bun Protective Style

Today I'm sharing the style that I've used to avoid heat for the last 5 weeks: Jada Beauty's Vintage Rolled Bang + Low Bun protective style. I love this style because air dried hair gives it fullness and its perfect for an old (or busted) twist/braid out.


Jada's PIN-tutorial is pretty self explanatory. In less than 5 minutes you can have a super cute protective style. Here are the products that I used when I styled my hair:
  • Dab of Organix Coconut Anti-Breakage Serum through my hair with focus on my ends. 
  • Virgin Coconut Oil massaged on my scalp (it has been 1-2 days since my wash) 
  • Massaged Koils by Nature: Perfectly Peppermint Hair Butter through my hair 
I styled my hair with a black bow! Y'all know that I love my bows! What have you been PINspired to create?

xoxo
Keyda


Thursday, February 20, 2014

Braid Wrapped Bun | Pinspired


Pinterest is the ultimate to go unleash your inner creative foodie, unique fashionista, and intriguing abstract artist. Of course, being all things hair obsessed, SavingOurStrands has hundreds of captivating and cute styles for you to be inspired by when that bun gets too boring. So, I'm putting a little pep into my protective style step with a monthly series recreating PINspired hairstyles.

SIDEWALK ready
PINspired Sidewalk Ready Braid Wrapped Bun
  1. Begin with detangled and moisturized hair. (My hair was previously flat ironed).
  2. Create a deep side part then section from top of crown to ear. Clip out of the way.
  3. Smooth the rest of your hair into a bun and secure with bobby pins.
  4. Take the remaining loose section, braid going backwards, then wrap it around your bun. 
  5. Pin until everything feels secure.

Here's the video from Kayley at Sidewalk Ready for my lovely visual readers:


Tips and Tricks:
  1. Skip the mesh donut- I know, its very tempting to try this look with a mesh donut. But I promise you that you will not get the same "swirly" bun affect. If your hair is at least shoulder length (maybe even a bit shorter), you can pull this look off by twisting your hair around in a bun and securing with pins.
  2. I can't braid- No te preocupes por eso chica! A double strand twist will look just as stunning. 
  3. Do I have to back comb? Heck no! The best thing (and the worst thing) about textured hair is that we wake up with big hair. I'm not a back comber and you don't have to do it to achieve this look. 
What have you been PINspired by lately? Add a link to your fave below. (Even non-hair related links are allowed!)

Besitos!
KLP


Thursday, January 09, 2014

Zoe Saldana Milk Maid Twists | PINspired

Pinterest is the ultimate to go unleash your inner creative foodie, unique fashionista, and intriguing abstract artist. Of course, being all things hair obsessed, SavingOurStrands has hundreds of captivating and cute styles for you to be inspired by when that bun gets too boring. So, my girl Britt from One&20 and I are back to put a little pep into your protective style step with a monthly series recreating PINspired hairstyles on both relaxed and natural hair. 

PINspired Zoe Zaldana Milk Maid Twist
  1. Begin with detangled and moisturized hair. (My hair was previously cold air tension dried and faux banded to smooth my roots)
  2. Divide hair into two sections. (Optional: Leave a small section out to fame your face. I bantu knotted my bangs for a soft curl)
  3. Create two loose twists on each side (Four twists total). Start one of the twists at high level and the other near your ear. This will create the illusion of fuller twists. Pull the top twist over to the crown of your head and secure with a bobby pin. Do the same with the bottom twist
  4. Repeat on the opposite side.
  5. Pin until the braids feel secure.

Tips and Tricks:
  1. My hair isn't long enough. No sweat, either was mine. Which is why, I did two twists instead of one braid. The top twist stretches across to the opposite side, whilst the bottom twists "connects" from your ear up. Sneaky trick huh?
  2. My hair isn't thick enough. Create more twists! Try 3 or even 4 to get the illusion of a fuller thicker braid across. Remember to stagger them as you pin.
  3. My hair doesn't have enough volume. Consider air drying before beginning this style. An old bantu knot or braid out will give you the volume that you crave.  
Visit Britt over at One&20 for pointers on creating this style on natural hair!

What have you been PINspired by lately? Link up your faves below! (No sweat if it isn't hair related!)